进行负载测试
为了快速实现测试脚本,我首先选择了使用 Gatling 录制功能进行脚本录制,成功录制以后会在指定的“Output folder”目录下面生成你指定“Class Name”为名字的脚本,见图 3。
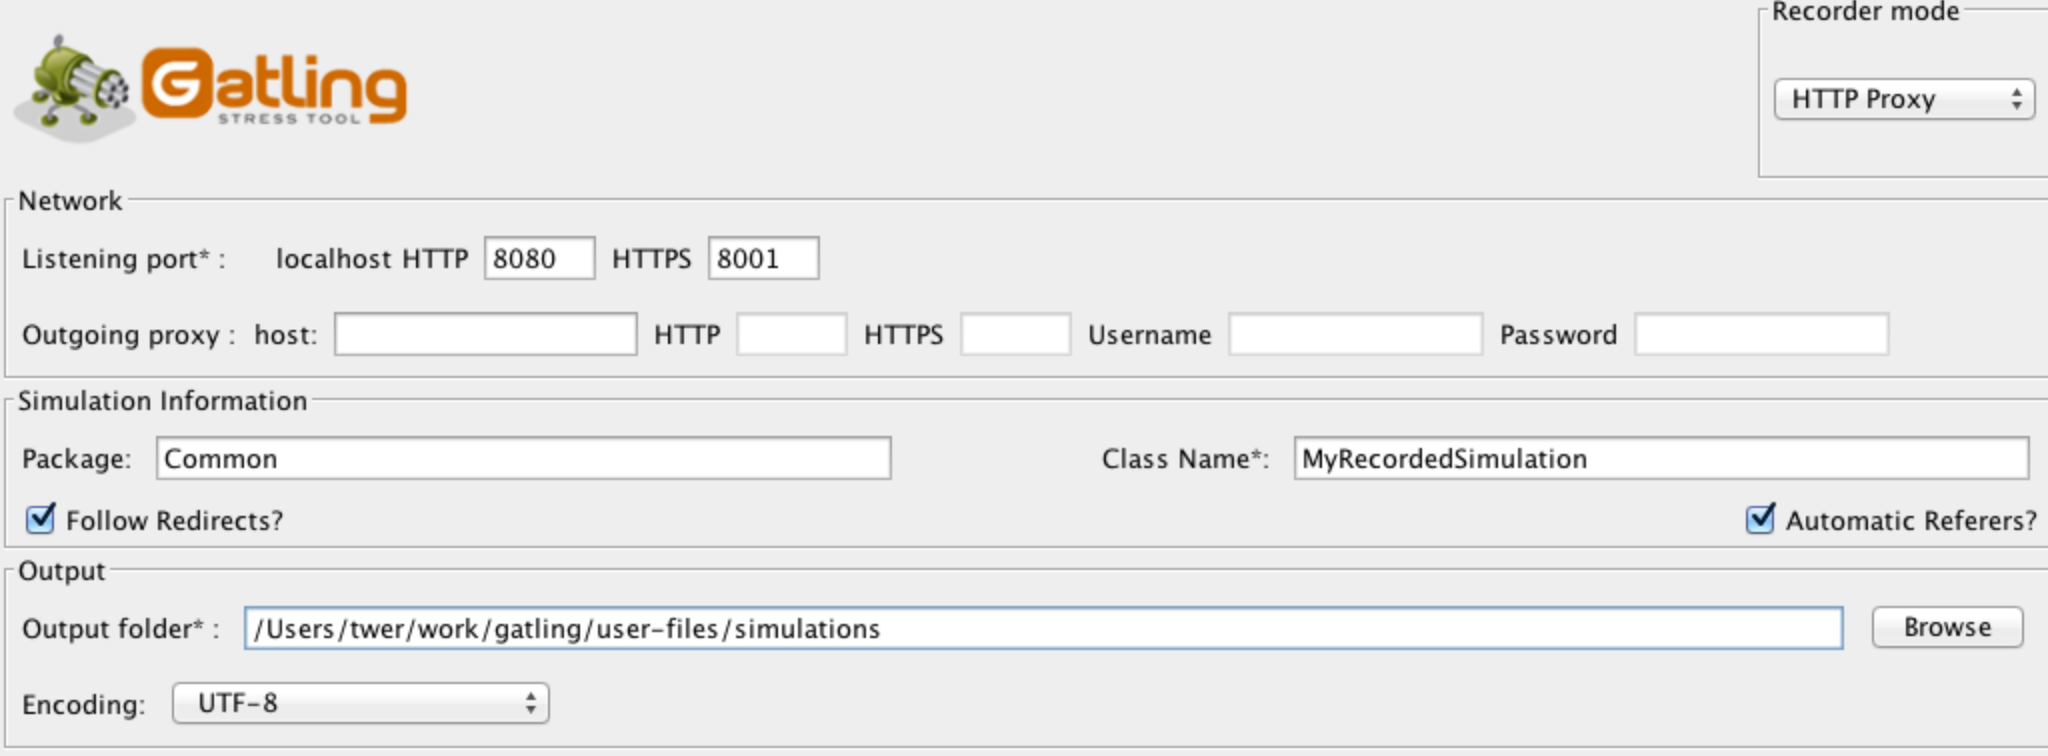
图 3,Gatling Recorder
根据图 3 的配置,录制好的脚本存放在 /Users/twer/work/gatling/user-files/simulations/Common/MyRecordedSimulation.scala。生成的部分脚本代码如下:
class MyRecordedSimulation extends Simulation { val httpProtocol = http .baseURL("http:// :10.17.7.3") .acceptHeader("image/png,image/*;q=0.8,*/*;q=0.5") .acceptEncodingHeader("gzip, deflate") .acceptLanguageHeader("en-US,en;q=0.5") .connection("keep-alive") .userAgentHeader("Mozilla/5.0 (Macintosh; Intel Mac OS X 10.8; rv:22.0) Gecko/20100101 Firefox/22.0") val headers_1 = Map( """Accept""" -> """text/html,application/xhtml+xml,application/xml;q=0.9, */*;q=0.8""", """If-None-Match""" -> """"a3ef335152d5532e2297bd8ad288f3f9"""")
录制代码段 1
.exec(http("request_21") .get("""/customer/images/new?app_dialog=true&dialog=true""") .headers(headers_18)) .pause(6) .exec(http("request_22") .get("""/customer/images?_=1374400463122""") .headers(headers_19)) .pause(165 milliseconds) .exec(http("request_23") .get("""/Users/twer/work/gatling/user-files/simulations/testdata/test1. png""") .headers(headers_20) .check(status.is(500))) .pause(2) .exec(http("request_24") .get("""/customer/images?view=list""")) .pause(86 milliseconds) …… setUp(scn.inject(atOnce(1 user))).protocols(httpProtocol)
录制代码段 2
录制出来的脚本拥有很多局限性:
- 只支持 1 个用户
- 没有检测点
- 没有逻辑分层
因此,它并不能用于真正的性能测试。对于这样的原始代码,我们需要进行大量的重构,使代码拥有很好的可读性和可维护性。
首先我们要进行分层处理:
-
对于录制代码段 1,需要建立一个 Header 类来管理所有 HTTP Header,这里使用“Headers.scala”,在录制代码段 1 中只给出了“headers_1”,实际的脚本包含了大量的 Header。
-
对于录制代码段 2,需要将测试场景和测试控制分开,每一个测试场景使用一个文件来保存,代码段 2 所示的场景使用“UploadImageScenario.scala”来保存。主控脚本也需要分离出来存入“MainSimulation.scala”,通过调用不同的测试场景的脚本,从而可以复用 HTTP 的配置选项,比如: ```
val httpProtocol = http
.baseURL(“http:// :10.17.7.3”)
其次,我们还需要增加多用户的支持: - 多用户数据的读入,其中“user\_credentials.csv”存储的就是用户名和密码
.feed(csv(“user_credentials.csv”))
.exec(http(“request_login”)
.post("""/customer/login""")
.param(""“username”"", “”"${username}""")
.param(""“password”, “${password}”"")
- 设置多用户的值。由于我们使用的是虚拟机,所以经过测试,确定为 400 用户并发。
setUp(LoginScenario.loginScn.inject(ramp(400 users) over(60 seconds))).
protocols(httpProtocol)
- 最后,我们还要增加检测点,使用 check,find,status 等函数进行检测,下面的代码检测了用户登出的时候 HTTP Response Status 是否为 302:
exec(http(“request_logout”)
.get(("""/customer/logout""")
.headers(headers_logout)
.check(status.is(302)))
当然,如果测试人员熟悉 Gatling DSL API,我们也可以不用录制代码再进行重构,而是直接设计测试系统并进行测试案例的开发。 项目采取了敏捷方法进行开发,所以系统的一些功能在开发过程中会出现频繁改动,导致测试场景和测试脚本也会随之发生改变,因此,测试脚本的可读性和可维护性对于我们来说就非常重要。当某个功能改变之后,使用 Gatling 脚本就能十分方便的进行阅读和重构。比如对于添加 user 的功能,第一版只需要能添加 user 即可(见 ** 添加 user 代码 1**),而在下一版中,则要求在添加 user 时可以选择该 user 具有那些权限(见 ** 添加 user 代码 2**),代码如下:
.exec(http(“request_add_user”)
.post("""/customer/users""")
.headers(headers_user)
.param(""“utf8"”", “”“✓”"")
.param(""“user[username]”"", “”“user2"”")
.param(""“user[email]”"", “”“user@gmail.com”"")
.param(""“user[password]”"", “”“user2"”")
.param(""“user[password_confirmation]”"", “”“user2"”")
** 添加 user 代码 1**
.exec(http(“request_add_user”)
.post("""/customer/users""")
.headers(headers_user)
.param(""“utf8"”", “”“✓”"")
.param(""“user[username]”"", “”“user2"”")
.param(""“user[email]”"", “”“user@gmail.com”"")
.param(""“user[password]”"", “”“user2"”")
.param(""“user[password_confirmation]”"", “”“user2"”")
.param(""“user[plugins][]”"", “”“customer_dashboard”"")
.param(""“user[plugins][]”"", “”“customer_files”"")
.param(""“user[plugins][]”"", “”“customer_images”"")
.param(""“user[plugins][]”"", “”“customer_pages”""))
** 添加 user 代码 2** 项目发布后,若项目功能发生改变,我们也可以使用 Gatling 进行持续的性能回归测试,保证系统性能不会因为某次修改导致非预期的降低。如果降低了,就要进行及时的调查,修复或者是调整,保证性能一直在预期的可控范围内。 ** 测试报表 ** Gatling 测试报表基于 HTML,并且在测试过程中业已生成,所以打开速度很快。而且,当把鼠标移动到不同数据轴上时,都会有弹出框显示这个点上详细的测试数据信息。这种动态显示数据的方式非常方便查看和分析数据。考虑到项目真实数据的不便,我将通过 Gatling 官方网站给出的示例报表进行说明。 Gatling 的报表分为两类:GLOBAL 和 DETAILS,其中 GLOBAL 主要是请求相关的统计数据,比如每秒请求数,请求成功与失败数等;其中 DETAILS 主要是请求时间相关的统计数据,比如请求响应时间,请求响应延迟时间等。 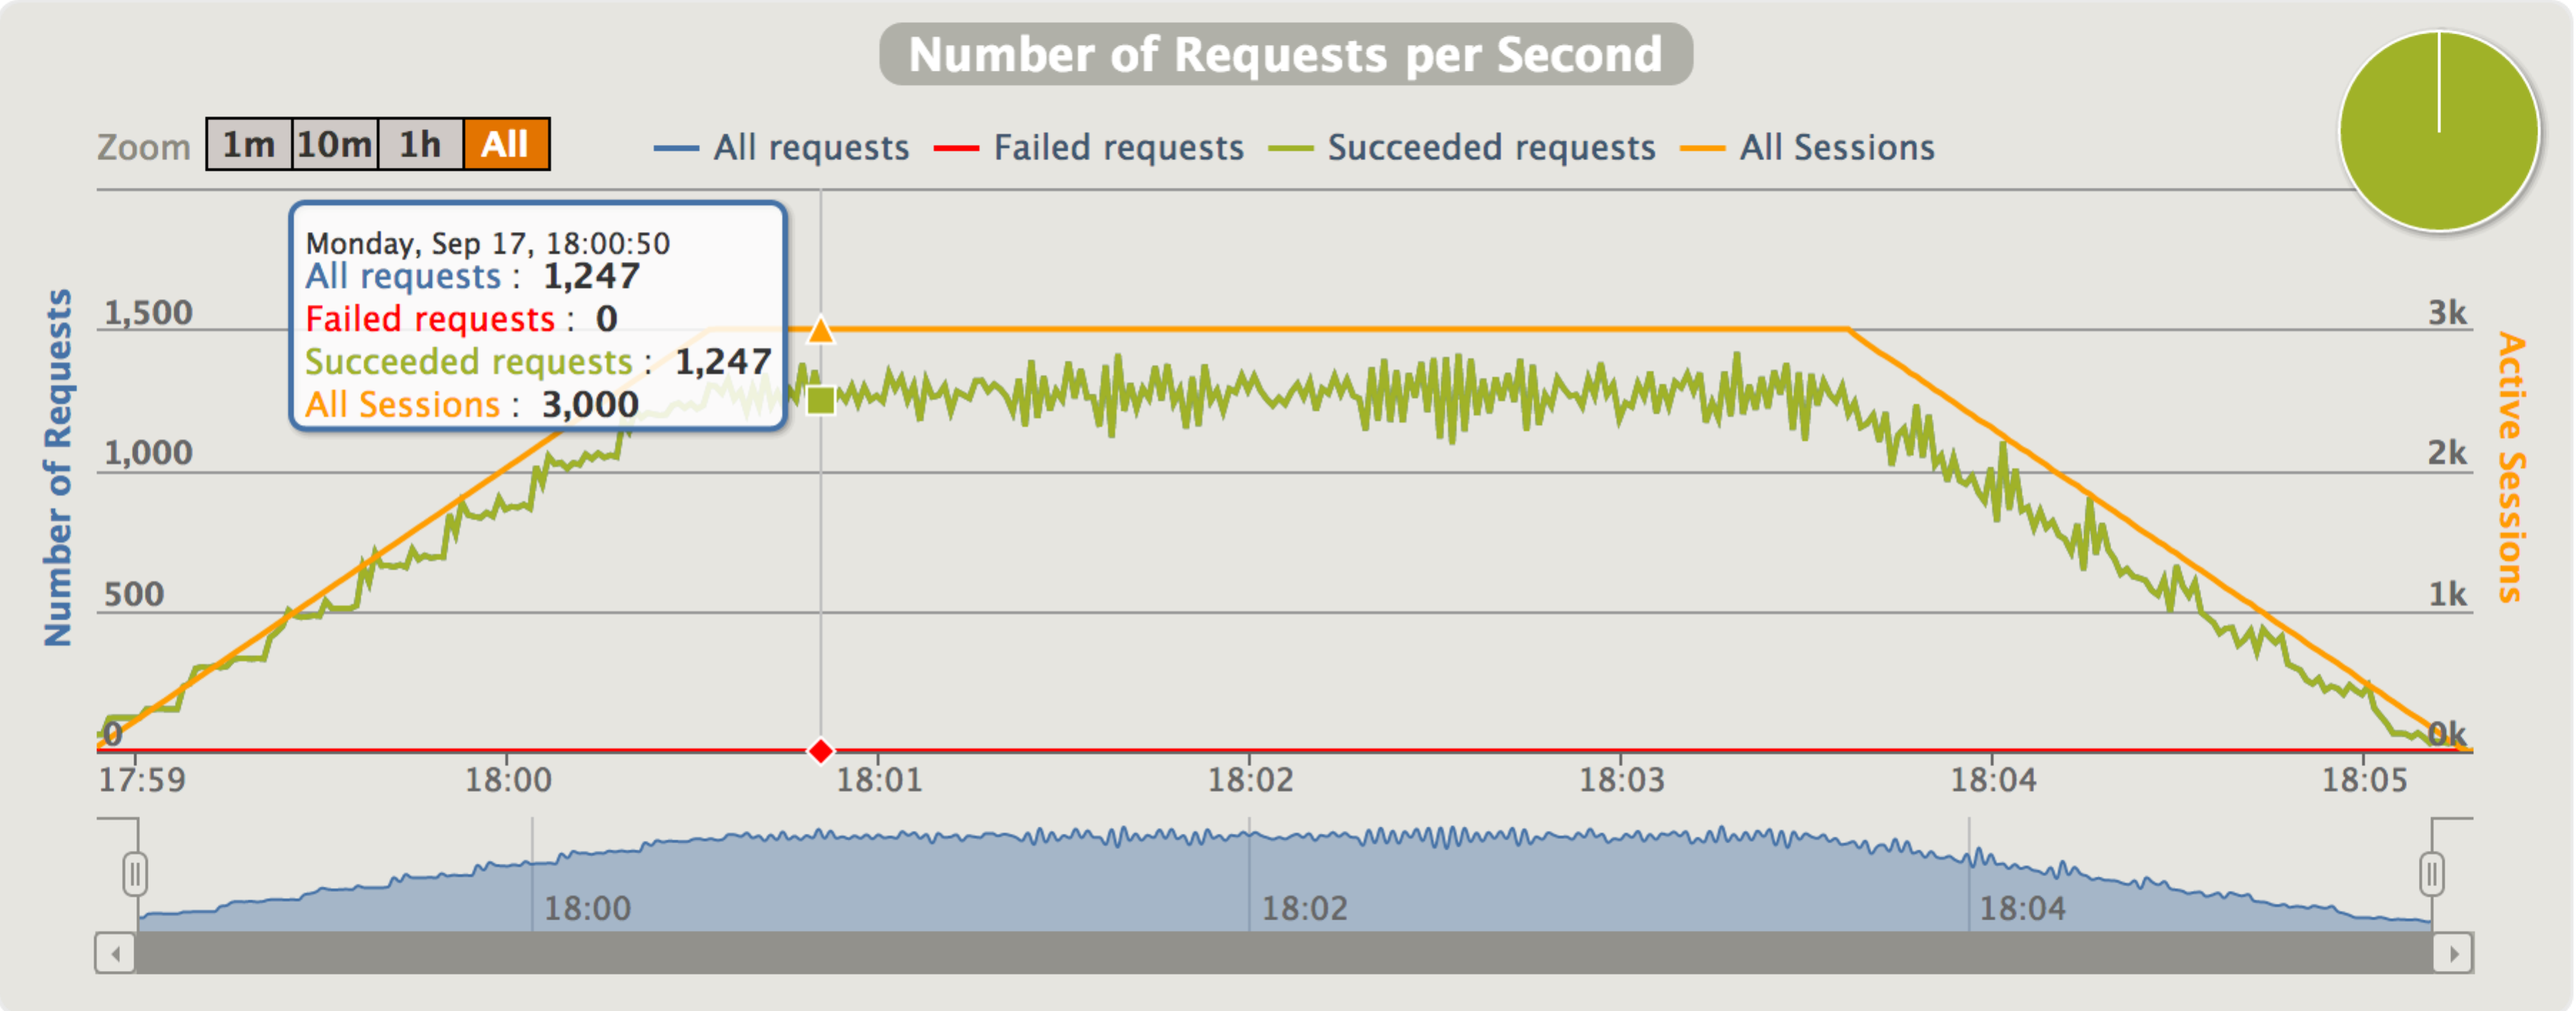 ** 图 4 每秒请求数,来自 ** [**http://gatling-tool.org/sample/req\_home.html**](http://gatling-tool.org/sample/req_home.html) 当鼠标放到图中任何一个点的时候,对应时间点上请求的详细数据就会以图中白色的弹出框的方式进行显示。在下面的请求响应延迟时间图里面也有同样的功能。 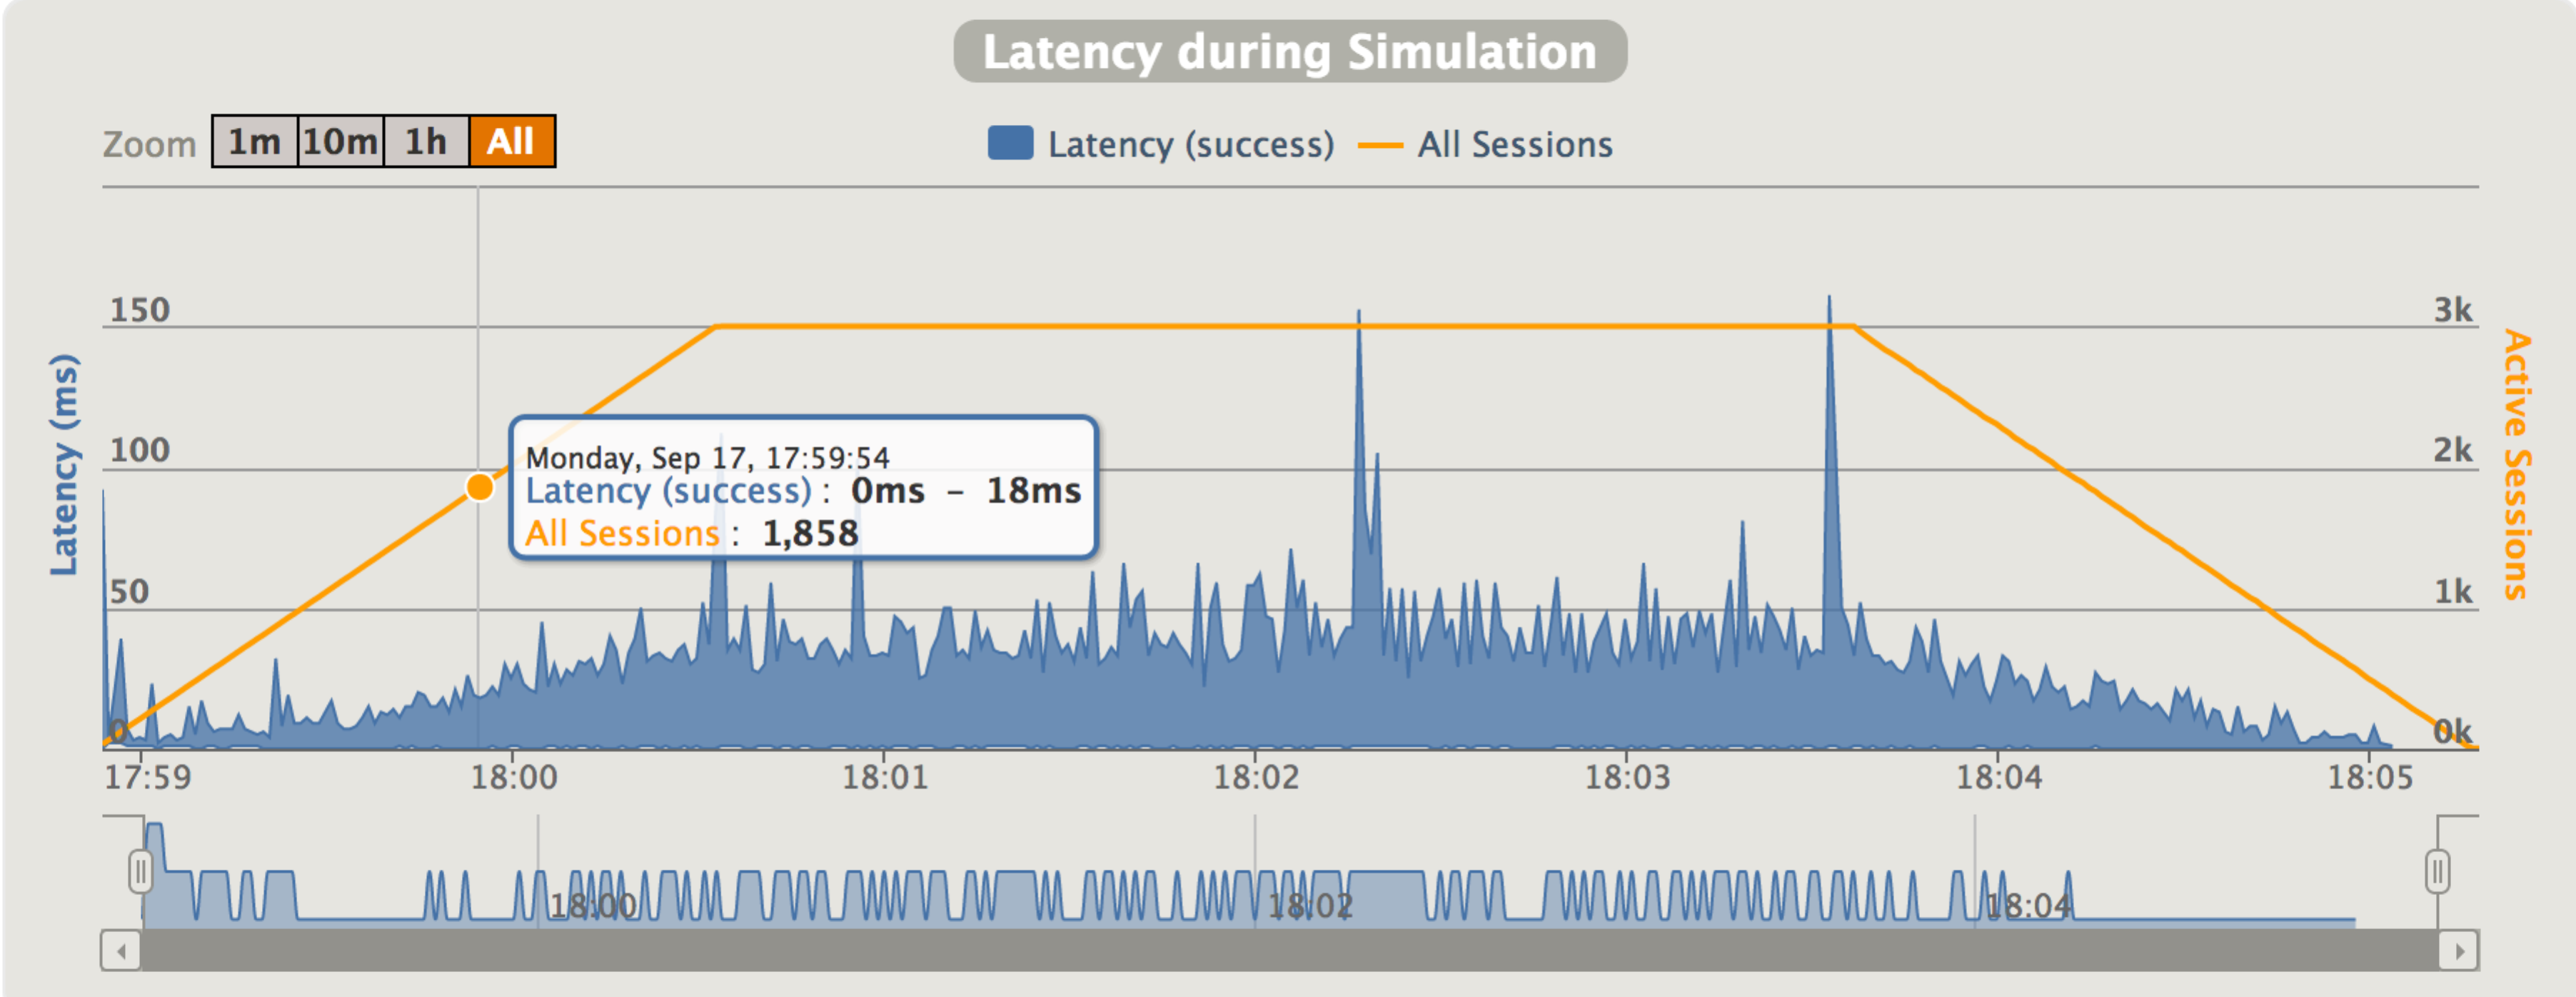 ** 图 5 请求响应延迟时间,来自 http://gatling-tool.org/sample/index.html** 3,与 CI 的集成 项目的 CI 系统选用的是 Jenkins,因为 Jenkins 有 Gatling 的插件,所以通过这个插件可以在 Jenkins 上直接查看 Gatling 的测试结果,如图 6 所示。 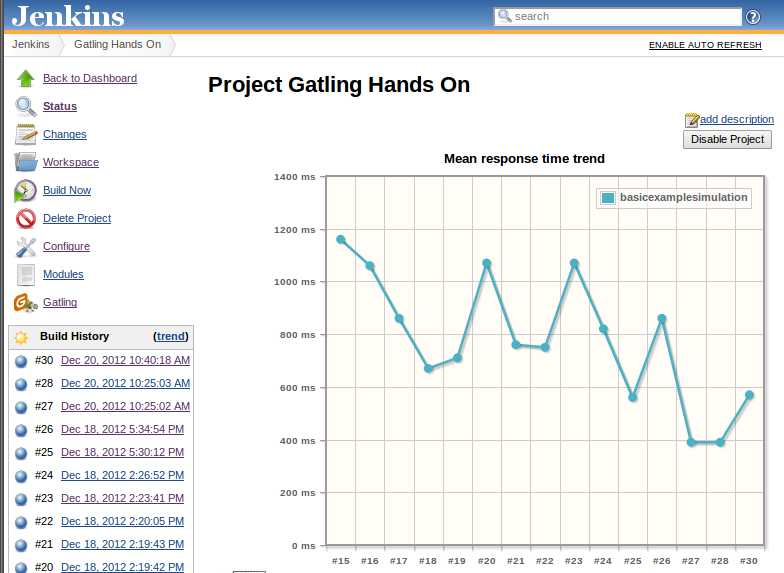 ** 图 6 Jenkins Gatling 插件,图片来自:**[**https://wiki.jenkins-ci.org/display/JENKINS/Gatling+Plugin**](https://wiki.jenkins-ci.org/display/JENKINS/Gatling+Plugin) 我们还把生成的报表存档到每个 Build 里面,这样就可以在每个 Build 中获得那次测试的所有报表。





评论