
本文最初发表于作者 Piotr Mińkowski 的个人站点,经作者许可由 InfoQ 中文站编译分享。
2020 年 12 月 22 日,Spring在官方博客正式发布2020.0.0版本(即Ilford),这是一个采用新命名规范的版本,但是,更引人关注的是该版本移除了多个之前处于维护模式的 Netflix 组件,如 Ribbon、Hystrix 和 Zuul。唯一剩余的模块是 Eureka。这些变化对 Spring Cloud 来说是很重要的,因为从诞生之初,Spring Cloud 就因为与 Netflix 组件的集成得到广泛认可。此外,Spring Cloud Netflix 仍然是 GitHub 上最受欢迎的 Spring Cloud 项目(约有 4200 star)。
在将 Netflix 组件转入维护模式的同时,Spring 团队已经开始着手准备替代方案了。因此,Ribbon 将被 Spring Cloud Load Balancer 取代,Hystrix 将被建立在 Resilience4J 库之上的 Spring Cloud Circuit Breaker 取代。Spring Cloud Gateway 是 Zuul 的竞争解决方案,目前已是一个很受欢迎的项目,在 Ilford 版本后,它将是 API 网关方面的唯一方案。
本文的主要目的是指导你使用新的 Spring Cloud 组件构建微服务架构,替换废弃的 Netflix 项目。示例应用的源码可以在GitHub上的仓库中找到。
架构
下图展现了我们样例系统的架构。在这里,我们包含了微服务的特征元素,如 API 网关、服务发现 server 以及配置 server。接下来,我会展示如何使用提供了这些模式的 Spring Cloud 组件。目前,向系统中添加 API 网关的主要组件是 Spring Cloud Gateway。
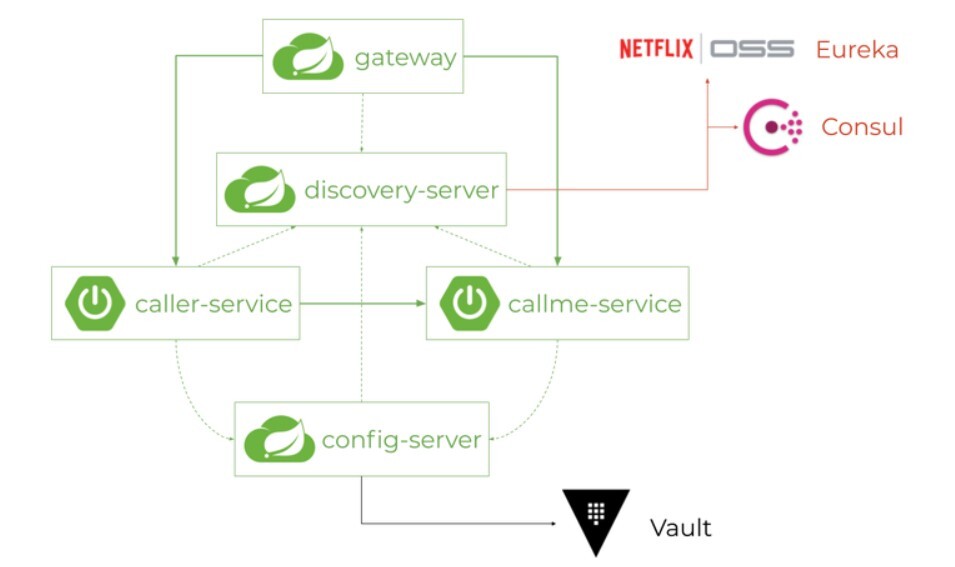
Spring Cloud 提供了与多个可用作服务发现服务器的方案的集成,包括 Netflix Eureka、HashiCorp Consul、Alibaba Nacos 和 Apache ZooKeeper。其中,最流行的是前两者。Spring Cloud Netflix Eureka 专门用于服务发现,而 Spring Cloud Consul 可同时通过 Consul Services 实现服务发现,通过 Consul Key/Value 引擎实现分布式跟踪特性。
Spring Cloud Config 只负责提供一个配置管理的机制。但是,它也可以与第三方工具集成,如来自 HashiCorp 的 Vault。以两个简单的 Spring Boot 应用 callme-service 和 caller-service 为例,我们阐述如何将应用与服务发现和配置服务器进行集成。我们还会在 caller-service 上使用 Spring Cloud Load Balancer 启用客户端负载均衡,并使用基于 Resilience4J 构建的 Spring Cloud Circuit Breaker 启用断路器功能。
服务发现
借助 Spring Cloud 的 DiscoveryClient 抽象,在客户端切换不同的服务发现服务器非常容易。这种切换只需要替换 Maven pom.xml文件中的一个依赖项。如果你想要使用 Eureka 的话,只需要添加如下的 starter 到微服务中。
<dependency> <groupId>org.springframework.cloud</groupId> <artifactId>spring-cloud-starter-netflix-eureka-client</artifactId></dependency>而如果你想要使用 Consul 的话,那么需要添加如下的 starter 到微服务中。
<dependency> <groupId>org.springframework.cloud</groupId> <artifactId>spring-cloud-starter-consul-discovery</artifactId></dependency>如果你想要为服务发现的客户端定义一些非默认的配置的话,那情况就有点复杂了。在这种情况下,你需要使用特定于 Eureka 或 Consul 的属性。例如,如果你想要在同一个主机上运行同一个应用的多个实例,并启用动态 HTTP 服务器端口(选项server.port=0),那么你需要为每个实例设置一个唯一的 id。如下是 Eureka 客户端中所使用的属性。
eureka: instance: instanceId: ${spring.cloud.client.hostname}:${spring.application.name}:${random.value}对 Consul 客户端来说,相同的配置如下所示。
spring: cloud: consul: discovery: instanceId: ${spring.cloud.client.hostname}:${spring.application.name}:${random.value}在微服务架构中,我们可以很容易地通过 Spring Cloud Netflix Eureka Server 模块配置和运行 Eureka 服务发现。只需要创建包含该模块的 Spring Boot 应用即可。
<dependency> <groupId>org.springframework.cloud</groupId> <artifactId>spring-cloud-starter-netflix-eureka-server</artifactId></dependency>我们还需要为应用启用 Eureka,只需在主类上添加 @EnableEurekaServer 注解。
@SpringBootApplication@EnableEurekaServerclass DiscoveryServerApplicationfun main(args: Array<String>) { runApplication<DiscoveryServerApplication>(*args)}在本地机器上运行 Consul 的最简便方式是使用它的 Docker 镜像。我们可以通过执行如下命令以开发模式在 Docker 容器中运行 Consul:
$ docker run -d --name=consul -e CONSUL_BIND_INTERFACE=eth0 -p 8500:8500 consul:1.7.2使用 Spring cloud 进行分布式配置
在我们的架构中,下一个重要的元素就是配置服务器。在 Spring Cloud 中,能提供分布式配置机制的最流行方案就是 Spring Cloud Config。Spring Cloud Config 为分布式系统中的外部化配置提供了服务器端和客户端的支持。
借助配置服务器,我们能有一个中心化的位置管理应用在所有环境下的外部属性。有一些其他的方案可用作基于微服务的架构的配置服务器,如 Consul、ZooKeeper 和 Alibaba Nacos。但是,从严格意义上来讲,所有的这些方案都不是专门的分布式配置,它们也可以用作服务发现的服务器。Spring Cloud Config 可能会集成不同的工具来存储数据。服务器存储后端的默认实现是使用 git,但是我们也能使用像 HashiCorp Vault 这样的工具来管理 secret 和保护敏感数据,也可以使用简单的文件系统。在一个配置服务器应用中,可能会将不同的后端组合在一起。我们只需要在应用属性文件中通过spring.profiles.active激活对应的 profile 即可。我们可以覆盖一些默认值,比如修改 Vault 服务器的地址或设置认证 token。
spring: application: name: config-server profiles: active: native,vault cloud: config: server: native: searchLocations: classpath:/config-repo vault: host: 192.168.99.100 authentication: TOKEN token: spring-microservices-course对 Consul 来讲,同样如此,在开发模式下,我们应该使用 Docker 来运行 Vault 实例。我们可以使用环境变量VAULT_DEV_ROOT_TOKEN_ID设置一个静态的根 token 用于进行认证:
$ docker run -d --name vault --cap-add=IPC_LOCK -e 'VAULT_DEV_ROOT_TOKEN_ID=spring-microservices-course' -p 8200:8200 vault:1.4.0当 Spring Cloud Config 与服务发现一起使用时,我们可以在两种可用的方式间做出选择,即 Config First Bootstrap 和 Discovery First Bootstrap。在 Discovery First Bootstrap 中,配置服务器会将自身注册到发现服务中。借助这一点,每个微服务都能基于配置服务器的注册 id 找到它。
因为配置是在引导阶段注入的,我们需要使用bootstrap.yml在客户端设置属性。为了在客户端启用配置服务器的“发现”功能,我们需要将spring.cloud.config.discovery.enabled属性设置为true。如果配置服务器的注册服务 id 与自动配置的configserver(在我们的样例中是config-server)不同的话,我们还应该覆盖它。当然,还可以使用 Consul 作为配置属性源。
spring: application: name: callme-service cloud: config: discovery: enabled: true serviceId: config-server consul: host: 192.168.99.100 config: format: YAML服务间通信
目前,有三种基于 HTTP 的 Spring 组件可用于服务间的通信,它们都与服务发现进行了集成:同步的RestTemplate、反应式的WebClient以及声明式的 REST 客户端 OpenFeign。RestTemplate组件可以通过 Spring Web 模块获取,WebClient能通过 Spring WebFlux 模块获取。要包含 Spring Cloud OpenFeign 的话,我们需要一个专门的 starter。
<dependency> <groupId>org.springframework.boot</groupId> <artifactId>spring-boot-starter-webflux</artifactId></dependency><dependency> <groupId>org.springframework.cloud</groupId> <artifactId>spring-cloud-starter-openfeign</artifactId></dependency>要使用RestTemplate或WebClient进行支持服务发现的通信,我们需要注册 bean 并为它们添加@LoadBalanced注解。我们最好还要为这样的通信设置恰当的超时时间,当不使用断路器的时候,更应如此。
@SpringBootApplication@EnableFeignClientsclass InterCallerServiceApplication { @Bean @LoadBalanced fun template(): RestTemplate = RestTemplateBuilder() .setReadTimeout(Duration.ofMillis(100)) .setConnectTimeout(Duration.ofMillis(100)) .build() @Bean @LoadBalanced fun clientBuilder(): WebClient.Builder { val tcpClient: TcpClient = TcpClient.create() .option(ChannelOption.CONNECT_TIMEOUT_MILLIS, 100) .doOnConnected { conn -> conn.addHandlerLast(ReadTimeoutHandler(100, TimeUnit.MILLISECONDS)) } val connector = ReactorClientHttpConnector(HttpClient.from(tcpClient)) return WebClient.builder().clientConnector(connector) }}Spring Cloud LoadBalancer 提供了自己的抽象和实现。为了实现负载均衡机制,Spring Cloud 添加了ReactiveLoadBalancer接口,并支持基于 Round-Robin 和 Random 的实现。
目前,对于负载均衡的定制化并没有太多的选项。不过,选项之一就是配置客户端缓存的能力。默认情况下,每个客户端缓存目标服务的列表并且每隔 30 秒刷新一次。在你的场景下,这样的间隔可能会有些长。在配置中,我们可以很容易地修改它,如下面的样例,我们将其设置成 1 秒。如果你的负载均衡器与 Eureka 服务发现进行集成的话,还需要减少获取注册表的时间间隔,默认它是 30 秒钟。在修改配置之后,这两个对客户端的变更能几乎立即刷新当前运行的服务的列表。
spring: cloud: loadbalancer: cache: ttl: 1s ribbon: enabled: falseeureka: client: registryFetchIntervalSeconds: 1断路器
断路器是微服务架构中一个很流行的设计模式。它被设计用来探测失败并封装阻止失败不断重复出现的逻辑。Spring Cloud 提供了一个使用不同断路器的实现。针对 Resilience4J,有两个实现,分别用于反应式应用和非反应式应用。要启用非反应式的实现,我们要包含如下的依赖。
<dependency> <groupId>org.springframework.cloud</groupId> <artifactId>spring-cloud-starter-circuitbreaker-resilience4j</artifactId></dependency>如下是负责注册Customizer bean 的代码,这个 bean 配置了断路器的行为。
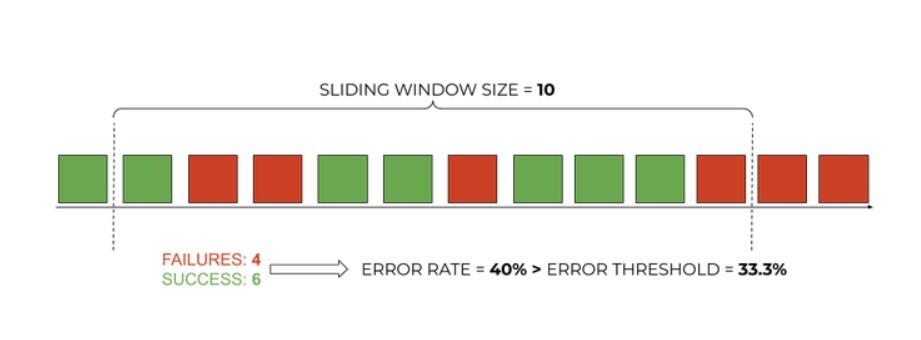
@Beanfun defaultCustomizer(): Customizer<Resilience4JCircuitBreakerFactory> { return Customizer { factory: Resilience4JCircuitBreakerFactory -> factory.configureDefault { id: String? -> Resilience4JConfigBuilder(id) .timeLimiterConfig(TimeLimiterConfig.custom() .timeoutDuration(Duration.ofMillis(500)) .build()) .circuitBreakerConfig(CircuitBreakerConfig.custom() .slidingWindowSize(10) .failureRateThreshold(33.3F) .slowCallRateThreshold(33.3F) .build()) .build() } }}断路器的设置通过如下图片进行了可视化。滑动窗口的大小设置了用于计算错误率的请求数。如果我们在大小为 10 的窗口中出现了 3 个以上的错误,那么断路器就会打开。
下一步,我们需要使用Resilience4JCircuitBreakerFactory创建一个断路器实例并为 HTTP 客户端启用它,如下所示。
@RestController@RequestMapping("/caller")class CallerController(private val template: RestTemplate, private val factory: Resilience4JCircuitBreakerFactory) { private var id: Int = 0 @PostMapping("/random-send/{message}") fun randomSend(@PathVariable message: String): CallmeResponse? { val request = CallmeRequest(++id, message) val circuit = factory.create("random-circuit") return circuit.run { template.postForObject("http://inter-callme-service/callme/random-call", request, CallmeResponse::class.java) } }}Spring Cloud API 网关
在我们微服务架构中,缺失的最后一个元素就是 API 网关。Spring Cloud Gateway 能帮助我们实现这一组件。目前,它是 Spring Cloud 中仅次于 Spring Cloud Netflix,欢迎程度排在第二名的项目。在 GitHub 上它有 2800+star。它构建在 Spring WebFlux 和 Reactor 项目之上,它以反应式的方式运行,需要 Netty 作为运行时框架。
API 网关的主要目标是提供一个有效的方式路由至 API,从而为外部客户端隐藏微服务系统的复杂性,但是它也能解决一些安全性和可靠性相关的问题。用来配置 Spring Cloud Gateway 的主要组件是路由。
它由一个 ID、一个目标 URI、一个断言的集合和一个过滤器的集合组成。如果断言聚合为 true 的话,则会匹配路由。通过过滤器,我们则可以在发送下游请求之前或之后修改请求和响应。
通过预定义的网关过滤器集合,我们可以实现路径重写、速率限制、发现客户端、断路器、fallback 或路由指标等机制。为了在网关上启用所有这些功能,我们首先需要包含以下依赖关系。
<dependency> <groupId>org.springframework.cloud</groupId> <artifactId>spring-cloud-starter-gateway</artifactId></dependency><dependency> <groupId>org.springframework.boot</groupId> <artifactId>spring-boot-starter-actuator</artifactId></dependency><dependency> <groupId>org.jetbrains.kotlin</groupId> <artifactId>kotlin-reflect</artifactId></dependency><dependency> <groupId>org.jetbrains.kotlin</groupId> <artifactId>kotlin-stdlib</artifactId></dependency><dependency> <groupId>org.springframework.cloud</groupId> <artifactId>spring-cloud-starter-netflix-eureka-client</artifactId></dependency><dependency> <groupId>org.springframework.boot</groupId> <artifactId>spring-boot-starter-data-redis-reactive</artifactId></dependency><dependency> <groupId>org.springframework.cloud</groupId> <artifactId>spring-cloud-starter-circuitbreaker-reactor-resilience4j</artifactId></dependency>为实现上述所列的所有特性,我们并不需要编写太多的代码。几乎所有的内容都是通过应用属性配置的。
spring: application: name: api-gateway cloud: gateway: discovery: locator: enabled: true lowerCaseServiceId: true routes: - id: inter-callme-service uri: lb://inter-callme-service predicates: - Path=/api/callme/** filters: - RewritePath=/api(?/?.*), $\{path} - name: RequestRateLimiter args: redis-rate-limiter.replenishRate: 20 redis-rate-limiter.burstCapacity: 40 - name: CircuitBreaker args: name: sampleSlowCircuitBreaker fallbackUri: forward:/fallback/test - id: inter-caller-service uri: lb://inter-caller-service predicates: - Path=/api/caller/** filters: - StripPrefix=1 - name: RequestRateLimiter args: redis-rate-limiter.replenishRate: 20 redis-rate-limiter.burstCapacity: 40 loadbalancer: ribbon: enabled: false redis: host: 192.168.99.100management: endpoints.web.exposure.include: '*' endpoint: health: show-details: always有些设置依然需要在代码中进行配置,也就是断路器的配置,它基于 Resilience4J 项目,我们需要注册Customizer bean。此外,我们还需要定义一个速率限制的 key,它用来设置为限制计数选择请求的策略。
@SpringBootApplicationclass ApiGatewayApplication { @Bean fun keyResolver(): KeyResolver = KeyResolver { _ -> Mono.just("1") } @Bean fun defaultCustomizer(): Customizer<ReactiveResilience4JCircuitBreakerFactory> { return Customizer { factory: ReactiveResilience4JCircuitBreakerFactory -> factory.configureDefault { id: String? -> Resilience4JConfigBuilder(id) .timeLimiterConfig(TimeLimiterConfig.custom() .timeoutDuration(Duration.ofMillis(500)) .build()) .circuitBreakerConfig(CircuitBreakerConfig.custom() .slidingWindowSize(10) .failureRateThreshold(33.3F) .slowCallRateThreshold(33.3F) .build()) .build() } } }}fun main(args: Array<String>) { runApplication<ApiGatewayApplication>(*args)}小结
在本文中,我们快速了解了如何使用最新的 Spring Cloud 组件构建微服务架构。关于这些组件的更多详情,读者可以阅读Spring Cloud的最新文档。
原文链接:
https://piotrminkowski.com/2020/05/01/a-new-era-of-spring-cloud/


