神经结构化学习(Neural Structured Learning,NSL)是 TensorFlow 中的一个框架,可用于训练具有结构化信号的神经网络。它以两种方式处理结构化数据:(i)作为显式图,或(ii)作为隐式图,其中邻居在模型训练期间动态生成。具有显式图的 NSL 通常用于神经图学习,而带有隐式图的 NSL 通常用于对抗性学习。这两种技术都是作为 NSL 框架中的正则化形式实现的。因此,它们只影响训练工作流,故模型服务工作流保持不变。在本文的其余部分,我们将主要关注如何使用 TFX 中的 NSL 框架实现图的正则化。
使用 NSL 构建图正则化模型的高级工作流需要执行以下步骤:
若无可用图,则构建一个图。
使用图和输入示例特征来增强训练数据。
使用增强的训练数据将图的正则化应用到给定的模型。
这些步骤并不会立即映射到现有的 TFX 管道组件 上。但是,TFX 支持自定义组件,这些组件允许用户在其 TFX 管道中实现自定义处理。有关 TFX 中的自定义组件的介绍,请参阅这篇博文《创建自定义 TFX 组件》(Creating a Custom TFX Component)。因此,要在 TFX 中创建包含上述步骤的图正则化模型,我们将使用额外的定制 TFX 组件。
为了演示一个使用 NSL 的 TFX 管道示例,让我们考虑对 IMDB 数据集 上的情感分类任务。这里 提供了一个基于 CoLab 的教程,该教程演示了如何在原生 TensorFlow 使用 NSL 来完成这个任务,我们将使用它作为 TFX 管道示例的基础。
图正则化与自定义 TFX 组件
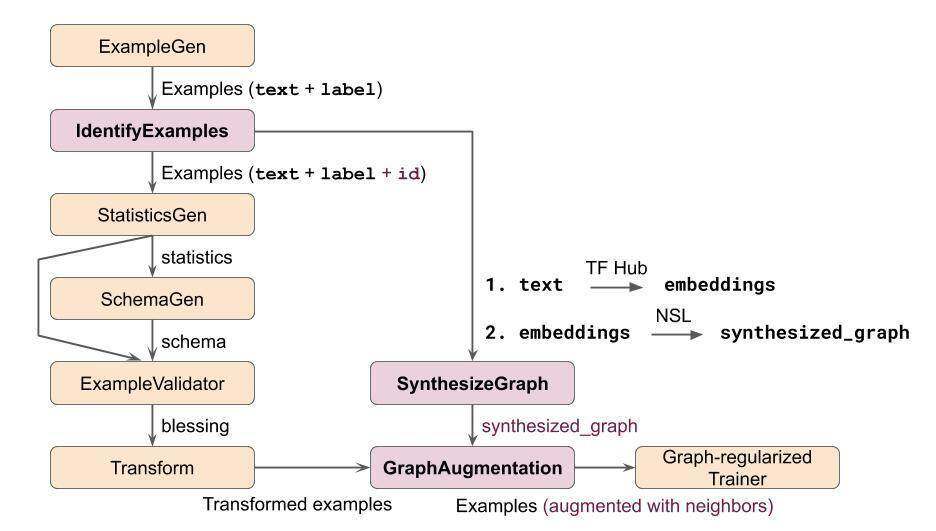
为了在 TFX 中为这一任务构建一个图正则化的 NSL 模型,我们将使用自定义 Python 函数 方法定义三个组件。以下是使用这些自定义组件的示例的 TFX 管道示意图。我们跳过了通常位于 Trainer 组件之后的组件,例如 Evaluator、Pusher 等。

图 1:使用图正则化的文本分类的 TFX 管道示例
在此图中,只有自定义组件(粉色)和图正则化 Trainer 组件具有 NSL 相关逻辑。值得注意的是,这里显示的自定义组件只是说明性的,可能还可以用其他方式构建功能等效的管道。现在,我们将更详细地描述每个自定义组件,并显示它们的代码段。
识别示例
这个自定义组件为每个训练示例分配一个唯一的 ID,用于将每个训练示例与图中的对应邻居关联起来。
@componentdef IdentifyExamples( orig_examples: InputArtifact[Examples], identified_examples: OutputArtifact[Examples], id_feature_name: Parameter[str], component_name: Parameter[str] ) -> None: # Compute the input and output URIs. ... # For each input split, update the TF.Examples to include a unique ID. with beam.Pipeline() as pipeline: (pipeline | 'ReadExamples' >> beam.io.ReadFromTFRecord( os.path.join(input_dir, '*'), coder=beam.coders.coders.ProtoCoder(tf.train.Example)) | 'AddUniqueId' >> beam.Map(make_example_with_unique_id, id_feature_name) | 'WriteIdentifiedExamples' >> beam.io.WriteToTFRecord( file_path_prefix=os.path.join(output_dir, 'data_tfrecord'), coder=beam.coders.coders.ProtoCoder(tf.train.Example), file_name_suffix='.gz')) identified_examples.split_names = orig_examples.split_names retumake_example_with_unique_id() 函数的作用是:更新给定的示例,使其包含唯一 ID 的附加特征。
SynthesizeGraph
如上所述,在 IMDB 数据集中,没有给出显式图作为输入。因此,在演示图正则化之前,我们先构建一个。对于这个示例,我们将使用预训练的文本嵌入模型将电影评论中的原始文本转换为嵌入,然后使用生成的嵌入来构建图。
SynthesizeGraph 自定义组件为我们的示例处理图的构建,请注意,它定义了一个新的 Artifact,名为 SynthesizeGraph,它将是这个自定义组件的输出。
"""Custom Artifact type"""class SynthesizedGraph(tfx.types.artifact.Artifact): """Output artifact of the SynthesizeGraph component""" TYPE_NAME = 'SynthesizedGraphPath' PROPERTIES = { 'span': standard_artifacts.SPAN_PROPERTY, 'split_names': standard_artifacts.SPLIT_NAMES_PROPERTY, }@componentdef SynthesizeGraph( identified_examples: InputArtifact[Examples], synthesized_graph: OutputArtifact[SynthesizedGraph], similarity_threshold: Parameter[float], component_name: Parameter[str] ) -> None: # Compute the input and output URIs ... # We build a graph only based on the 'train' split which includes both # labeled and unlabeled examples. create_embeddings(train_input_examples_uri, output_graph_uri) build_graph(output_graph_uri, similarity_threshold) synthesized_graph.split_names = artifact_utils.encode_split_names( splits=['train']) retucreate_embeddings() 函数涉及使用 TensorFlow Hub 上的一些预训练模型将电影评论中的文本转换为相应的嵌入内容, build_graph() 函数涉及在 NSL 中调用 build_graph() API。
GraphAugmentation
这个自定义组件的目的是将示例特性(电影评论中的文本)与从嵌入构建的图相结合,以生成一个增强的训练数据集。由此产生的训练示例也将包括来自相应邻居的特征。
@componentdef GraphAugmentation( identified_examples: InputArtifact[Examples], synthesized_graph: InputArtifact[SynthesizedGraph], augmented_examples: OutputArtifact[Examples], num_neighbors: Parameter[int], component_name: Parameter[str] ) -> None: # Compute the input and output URIs ... # Separate out the labeled and unlabeled examples from the 'train' split. train_path, unsup_path = split_train_and_unsup(train_input_uri) # Augment training data with neighbor features. nsl.tools.pack_nbrs( train_path, unsup_path, graph_path, output_path, add_undirected_edges=True, max_nbrs=num_neighbors ) # Copy the 'test' examples from input to output without modification. ... augmented_examples.split_names = identified_examples.split_names resplit_train_and_unsup() 函数的作用是:将输入示例分别分为已标记和未标记的示例,然后使用 pack_nbrs() NSL API 创建增强的训练数据集。
图正则化 Trainer
现在,我们所有的自定义组件都已实现,TFX 管道中剩余的特定于 NSL 的新增内容在 Trainer 组件中。下面是图正则化 Trainer 组件的简化视图:
estimator = tf.estimator.Estimator( model_fn=feed_forward_model_fn, config=run_config, params=HPARAMS) # Create a graph regularization config. graph_reg_config = nsl.configs.make_graph_reg_config( max_neighbors=HPARAMS.num_neighbors, multiplier=HPARAMS.graph_regularization_multiplier, distance_type=HPARAMS.distance_type, sum_over_axis=-1) # Invoke the Graph Regularization Estimator wrapper to incorporate # graph-based regularization for training. graph_nsl_estimator = nsl.estimator.add_graph_regularization( estimator, embedding_fn, optimizer_fn=optimizer_fn, graph_reg_config=graph_reg_config)如你所见,一旦创建了基本模型(在本例中是前馈神经网络),就可以通过调用 NSL 包装器 API 将其直接转换为图正则化模型。
就是这样!我们现在已经有了在 TFX 中构建图正则化 NSL 模型所需的所有缺失部分。这里提供了一个基于 CoLab 的教程,它在 TFX 中演示了这个端到端的示例。你可以自由地尝试并根据你的需要进行定制。
对抗性学习
正如前面的引言中所提到的,神经结构化学习的另一个方面是对抗性学习,它不是使用图的显式邻居来进行正则化,而是动态地和对抗性地创建隐式邻居来混淆模型。因此,使用对抗性示例进行规则化处理是提高模型健壮性的有效途径。使用 NSL 的对抗性学习可以很容易地集成到 TFX 管道中。它无需任何自定义组件,只需更新 Trainer 组件来调用 NSL 中的对抗性正则化包装器 API 即可。
总结
我们已经演示了如何使用自定义组件在 TFX 中使用 NSL 构建图形正则化模型。当然,也可以使用其他方式来构建图,以及以不同的方式构造整个管道,我们希望这个示例为你自己的 NSL 工作流提供一个基础。
相关链接
有关 NSL 的更多信息,请参阅以下资源:
作者介绍:
Arjun Gopalan,Google Research 软件工程师。
原文链接:
https://blog.tensorflow.org/2020/10/neural-structured-learning-in-tfx.html


