本文最初发表于 Towards Data Science 博客,经原作者 Shuyi Yang 授权,InfoQ 中文站翻译并分享。
在这篇文章中,我们将学习如何使用自编码器(autoencoder,一种特殊的人工神经网络)来实现数据匿名化。通过保持原始数据的保密性,这种方法提取的数据的潜在表示可以在下游机器学习预测任务中使用,而不会导致性能显著降低。
本文分为两部分。在第一部分,我将通过例子介绍一个自编码器的结构。在第二部分,我将展示如何使用自编码器对表格数据进行编码,以便将其匿名化,并将其用于其他机器学习任务,同时又能保护隐私。
自编码器
自编码器是一种特殊的神经网络,它由两部分组成:编码器和解码器。编码器部分接收输入数据并将其转换为潜在表示;而解码器部分尝试重构潜在表示的输入数据。损失是输入数据和重构数据之间的距离。
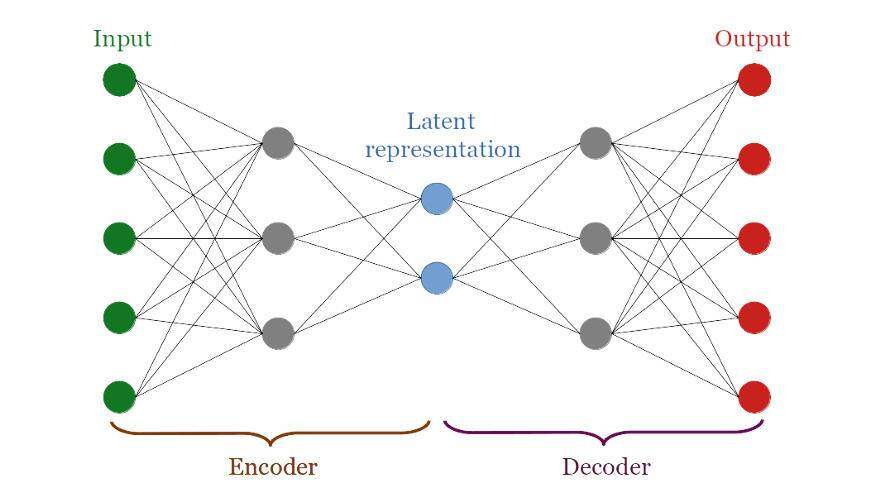
经过训练的自编码器能够提供一个良好的潜在表示。这种表示方式与原始数据非常不同,但是它包含了输入层中的所有信息。
为了说明这一点,让我们尝试在一个著名的公共数据集 MNIST 上运行一个自编码器。
让我们为本教程导入一些包。
from pandas import read_csv, set_option, get_dummies, DataFramefrom sklearn.preprocessing import MinMaxScalerfrom sklearn.model_selection import train_test_splitfrom sklearn.ensemble import RandomForestClassifierfrom sklearn.model_selection import cross_validatefrom sklearn.inspection import permutation_importancefrom numpy import mean, max, prod, array, hstackfrom numpy.random import choicefrom matplotlib.pyplot import barh, yticks, ylabel, xlabel, title, show, scatter, cm, figure, imshowfrom tensorflow.keras.layers import Input, Dense, Dropout, Activation, BatchNormalizationfrom tensorflow.keras import Modelfrom tensorflow.keras.datasets import mnistfrom tensorflow.keras.callbacks import EarlyStoppingfrom tensorflow.keras.utils import plot_modelfrom tqdm import tqdm我们将构建和训练不同的自编码器,因此,为了这个目的,让我们来定义一个函数。
def build_autoencoder(dim_input, dim_layer_1, dim_layer_2): input_layer = Input(shape=(dim_input,)) x = Activation("relu")(input_layer) x = Dense(dim_layer_1)(x) x = Activation("relu")(x) bottleneck_layer = Dense(dim_layer_2)(x) x = Activation("relu")(bottleneck_layer) x = Dense(dim_layer_1)(x) x = Activation("relu")(x) output_layer = Dense(dim_input, activation='relu')(x) encoder = Model(input_layer, bottleneck_layer) autoencoder = Model(input_layer, output_layer) autoencoder.compile(optimizer='adam', loss='mse') return autoencoder, encoder上面定义的自编码器有三个隐藏层。输入层和输出层大小相同。对神经网络进行训练时,通过计算输入与输出之间的差值来反向传播损失并更新权重,而在预测阶段,由于只需潜在表示,因此才采用了编码器部分的权重。
现在,加载已经分割成训练集和测试集的数据集。
(X_train, y_train), (X_test, y_test) = mnist.load_data()X_train = X_train.astype('float32') / 255.X_test = X_test.astype('float32') / 255.X_train = X_train.reshape((len(X_train), prod(X_train.shape[1:])))X_test = X_test.reshape((len(X_test), prod(X_test.shape[1:])))我们可以构建自编码器。
autoencoder, encoder = build_autoencoder( dim_input=X_train.shape[1], dim_layer_1=64, dim_layer_2=16)这个模型的摘要应该给出如下表所示的输出:
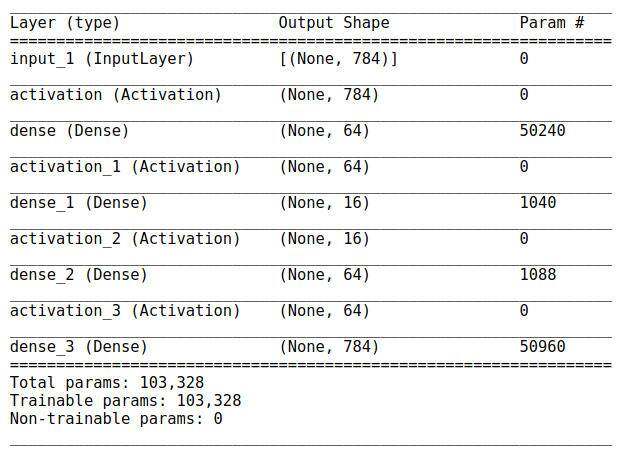
自编码器的层
我们用训练集来训练网络的权重。
callbacks = [ EarlyStopping( monitor='val_loss', min_delta=0.0001, patience=5, restore_best_weights=True )]autoencoder.fit( X_train, X_train, epochs=100, batch_size=256, shuffle=True, validation_split=0.3, callbacks=callbacks)一旦训练结束,我们就可以在测试集上对自编码器进行测试。
encoded = array(encoder(X_test))decoded = array(autoencoder(X_test))下面我们来绘制原始数据、编码的标识和重构的数据。
fig = figure(figsize=(16, 8))n_plots = 10n_rows = int(n_plots/2)for j in range(n_plots): fig.add_subplot(n_rows, 6, 3*j+1) plot_tmp = imshow(X_test[j].reshape([28, 28])) plot_tmp.axes.get_xaxis().set_visible(False) plot_tmp.axes.get_yaxis().set_visible(False) fig.add_subplot(n_rows, 6, 3*j+2) plot_tmp = imshow(encoded[j].reshape([1, 16])) plot_tmp.axes.get_xaxis().set_visible(False) plot_tmp.axes.get_yaxis().set_visible(False) fig.add_subplot(n_rows, 6, 3*j+3) plot_tmp = imshow(decoded[j].reshape([28, 28])) plot_tmp.axes.get_xaxis().set_visible(False) plot_tmp.axes.get_yaxis().set_visible(False) show()输出结果如下图所示:
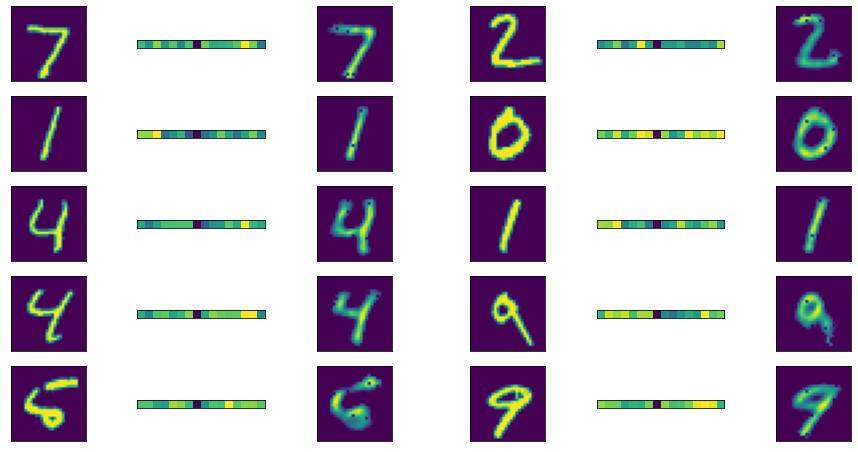
MNIST:原始图像、潜在表示和重构图像。
正如你所看到的,重构的图像(来自潜在的表示)与输入图像非常相似。这意味着自编码器学习的瓶颈表示(编码)是原始数据的良好表示,即使人类无法理解。
在表格数据集上,我们将重用这一思想,通过在潜在空间中获取原始数据的表示,从而对原始数据进行匿名化。
数据集
在这个实验中,我们将使用银行营销数据集。这些数据是关于一家葡萄牙银行机构的直接营销活动。机器学习的任务是分类,特别是我们需要建立一个模型来预测客户是否会认购定期存款。
本文中,我不会赘述这个数据集中的变量的描述。我们加载数据集并执行非常轻量级的处理。由于在执行调用之前,“duration”列是未知的,所以将其删除。
df = read_csv("data/bank-additional-full.csv", sep=";")y = (df.y == "yes") + 0del df["duration"]del df["y"]X = get_dummies(df)array_columns = X.columnsmin_max_scaler = MinMaxScaler()X = min_max_scaler.fit_transform(X)数据集概述如下图所示:

原始数据集是清晰的,而非匿名的数据。
原始数据的基准性能
在对数据进行匿名化之前,我们可以尝试使用交叉验证的基本随机森林来评估基准性能。需要指出的是,我们并不是试图找到最好的模型,我们所关心的是在原始数据上训练的模型和在编码的(匿名)数据上训练的模型之间的差异。
rf = RandomForestClassifier( n_estimators=500, max_depth=2, n_jobs=8, random_state=42)dict_performance = cross_validate( estimator=rf, X=X, y=y, cv=10, n_jobs=4, return_train_score=True, scoring=[ "balanced_accuracy", "f1_weighted", "roc_auc", "average_precision" ])df_performance = DataFrame( {"ORIGINAL": [mean(dict_performance[k]) \ for k in dict_performance.keys()]}, index=dict_performance.keys())性能表如下所示:
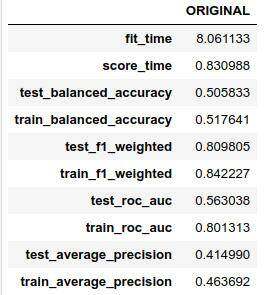
原始数据的基准性能
我们也可以绘制特征的重要性,以了解哪些特征会影响目标变量。
rf = RandomForestClassifier( n_estimators=500, max_depth=2, n_jobs=8, random_state=42)rf.fit(X, y)fi = permutation_importance( estimator=rf, X=X, y=y, n_repeats=10, n_jobs=8, random_state=42).importances_meanfigure(figsize=(16,8))barh( y=range(10, 0, -1), width=sorted(fi, reverse=True)[:10], alpha=0.9)ylabel("Feature")yticks( range(10, 0, -1), array_columns[fi.argsort()[::-1](:10)])xlabel("Importance")title("Original features importance")show()绘制结果如下图所示:
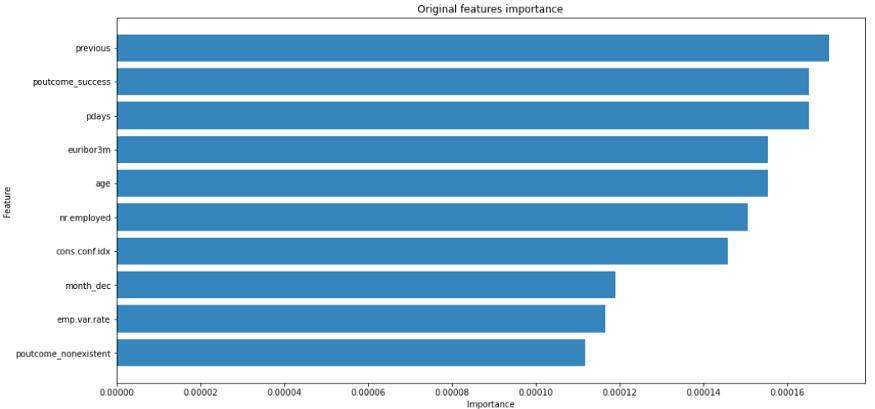
在使用自编码器对数据进行匿名化之前,特征非常重要。
正如你所注意到的,重要的特征主要是考虑到以前的竞选结果和总体经济形势。
使用自编码器进行数据匿名化
现在,我们准备匿名化数据集。首先,我们构建了一个自编码器,其中瓶颈层的大小是输入层的一半。
dim_layer_input = X.shape[1]dim_layer_1 = max((int(3*dim_layer_input/4), 1))dim_layer_2 = max((int(dim_layer_input/2), 1))autoencoder, encoder = build_autoencoder( dim_input=dim_layer_input, dim_layer_1=dim_layer_1, dim_layer_2=dim_layer_2)让我们训练一下网络。
autoencoder.fit( X, X, epochs=100, batch_size=256, shuffle=True, validation_split=0.3, callbacks=callbacks)并提取随机森林分类器的编码表示。
encoded = array(encoder(X))rf = RandomForestClassifier( n_estimators=500, max_depth=2, n_jobs=8, random_state=42)dict_performance = cross_validate( estimator=rf, X=encoded, y=y, cv=10, n_jobs=4, return_train_score=True, scoring=[ "balanced_accuracy", "f1_weighted", "roc_auc", "average_precision" ])df_performance["ENCODED"] = [ mean(dict_performance[k]) \ for k in dict_performance.keys()]性能如下表所示:
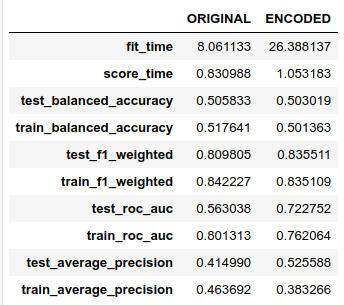
自编码器匿名数据的随机森林性能
还不错吧?然而,现在我们还不能描绘出特征的重要性,因为潜在表示是原始特征的组合。当然,我们可以从自编码器中提取权重,然后反向去了解哪些输入特征会影响更重要的潜在特征,但是这只有当自编码器像我们的示例一样具有简单结构时才可行。在其他情况下,我们可以对特征进行分组编码。
组编码特征匿名化
为了在匿名数据中保留某种业务知识,我们可以根据区域将原始特征进行分组,然后在每个组中应用自编码器匿名化。举例来说,在我们的示例中,我们对以下特征进行了划分:
个人信息;
财政状况;
之前的竞选结果;
以及整体经济状况。
feat_pers = ['age', 'marital_divorced', 'marital_married', 'marital_single', 'marital_unknown', 'education_basic.4y', 'education_basic.6y', 'education_basic.9y', 'education_high.school', 'education_illiterate', 'education_professional.course', 'education_university.degree', 'education_unknown','job_admin.', 'job_blue-collar', 'job_entrepreneur', 'job_housemaid', 'job_management', 'job_retired', 'job_self-employed', 'job_services', 'job_student', 'job_technician', 'job_unemployed', 'job_unknown']feat_fina = ['default_no', 'default_unknown', 'default_yes', 'housing_no', 'housing_unknown', 'housing_yes', 'loan_no', 'loan_unknown', 'loan_yes']feat_camp = ['campaign', 'pdays', 'previous', 'contact_cellular', 'contact_telephone', 'month_apr', 'month_aug', 'month_dec', 'month_jul', 'month_jun', 'month_mar', 'month_may', 'month_nov', 'month_oct', 'month_sep', 'day_of_week_fri', 'day_of_week_mon', 'day_of_week_thu', 'day_of_week_tue', 'day_of_week_wed', 'poutcome_failure', 'poutcome_nonexistent', 'poutcome_success']feat_econ = ['emp.var.rate', 'cons.price.idx', 'cons.conf.idx', 'euribor3m', 'nr.employed']然后,我们使用一个独立的自编码器对每个组的特征进行匿名化。
feat_groups = [ feat_pers, feat_fina, feat_camp, feat_econ]encoded = []for g in tqdm(feat_groups): dim_layer_input = len(g) dim_layer_1 = max((int(3*dim_layer_input/4), 1)) dim_layer_2 = max((int(dim_layer_input / 2), 1)) autoencoder, encoder = build_autoencoder( dim_input=dim_layer_input, dim_layer_1=dim_layer_1, dim_layer_2=dim_layer_2 ) X_tmp = X[:, array_columns.isin(g)] autoencoder.fit( X_tmp, X_tmp, epochs=100, batch_size=256, shuffle=True, validation_split=0.3, callbacks=callbacks, verbose=0 ) encoded.append(array(encoder(X_tmp)))X_encoded = hstack(encoded)由于之前已将每个匿名化特征进行了分组,因此我们可以为它们分配一个感兴趣的区域。
array_encoded_features = array( ["pers_"+str(j) for j in range(encoded[0].shape[1])] + \ ["fina_"+str(j) for j in range(encoded[1].shape[1])] + \ ["camp_"+str(j) for j in range(encoded[2].shape[1])] + \ ["econ_"+str(j) for j in range(encoded[3].shape[1])])通过这种方式,匿名数据集看起来如下表所示:

匿名数据集
让我们测试一下这个匿名化过程的预测能力。
rf = RandomForestClassifier(n_estimators=500, max_depth=2, n_jobs=8, random_state=42)dict_performance = cross_validate( estimator=rf, X=X_encoded, y=y, cv=10, n_jobs=4, return_train_score=True, scoring=[ "balanced_accuracy", "f1_weighted", "roc_auc", "average_precision" ])df_performance["GROUP_ENCODED"] = [mean(dict_performance[k]) for k in dict_performance.keys()]性能表如下表所示:
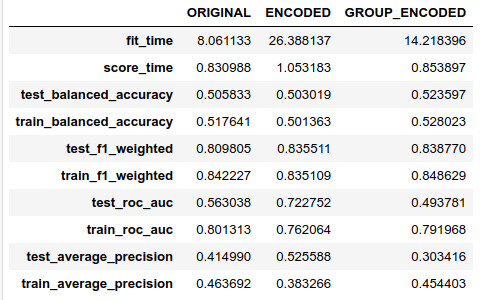
具有组编码特征的随机森林性能(匿名化之后)
在这种情况下,我们可以绘制出特征的重要性,因为我们知道每个匿名特征是从哪个感兴趣的区域创建的。
rf = RandomForestClassifier( n_estimators=500, max_depth=2, n_jobs=8, random_state=42)rf.fit(X_encoded, y)fi = permutation_importance( estimator=rf, X=X_encoded, y=y, n_repeats=10, n_jobs=8, random_state=42).importances_meanfigure(figsize=(16,8))barh( y=range(10, 0, -1), width=sorted(fi, reverse=True)[:10], alpha=0.9)ylabel("Feature")yticks( range(10, 0, -1), array_encoded_features[fi.argsort()[::-1](:10)])xlabel("Importance")title("Group-encoded features importance")show()绘制结果如下图所示:
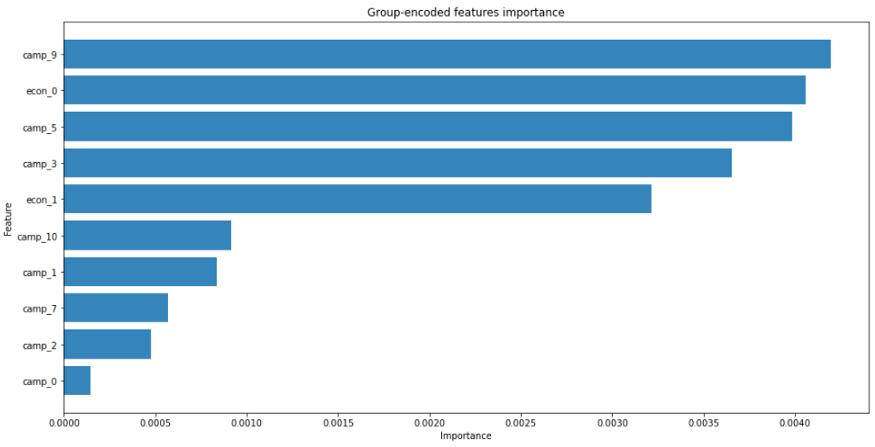
不出所料,先前竞选活动和经济形势的编码特征最为重要,这与对非匿名数据进行的分析相一致。为了获得更多的细节,我们可以通过更细的划分来创建特征组。
总结
在本教程中,我们已经学习了如何应用自编码器来对数据集匿名化,从而将编码后的数据传递给下游的机器学习任务。当数据应该被传递到其他预测性机器学习平台之外的地方进行测试时,这一点很有用(想象一下在云端中测试模型)。一个经过训练的自编码器可以保留原始数据的预测能力,但是,一旦对这些特征进行编码,就不可能执行探索性数据分析了(例如,将两个数据集合并在一起)。
参考资料:
https://en.wikipedia.org/wiki/Autoencoder
https://www.tensorflow.org/tutorials/generative/autoencoder
https://en.wikipedia.org/wiki/Data_anonymization


