本文最初发布于 Towards Data Science。
简介
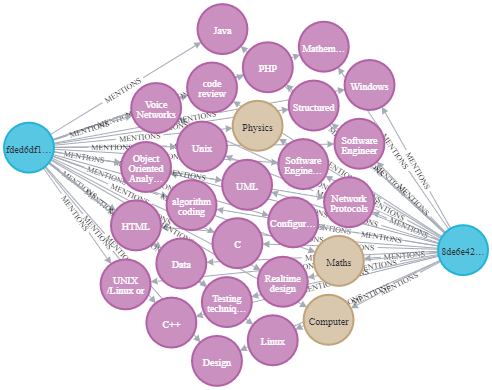
在这篇文章中,我将展示如何使用经过优化的、基于转换器的命名实体识别(NER)以及 spaCy 的关系提取模型,基于职位描述创建一个知识图谱。这里介绍的方法可以应用于其他任何领域,如生物医学、金融、医疗保健等。
以下是我们要采取的步骤:
在 Google Colab 中加载优化后的转换器 NER 和 spaCy 关系提取模型;
创建一个 Neo4j Sandbox,并添加实体和关系;
查询图,找出与目标简历匹配度最高的职位,找出三个最受欢迎的技能和共现率最高的技能。
要了解关于如何使用 UBIAI 生成训练数据以及优化 NER 和关系提取模型的更多信息,请查看以下文章。
职位描述数据集可以从Kaggle获取。
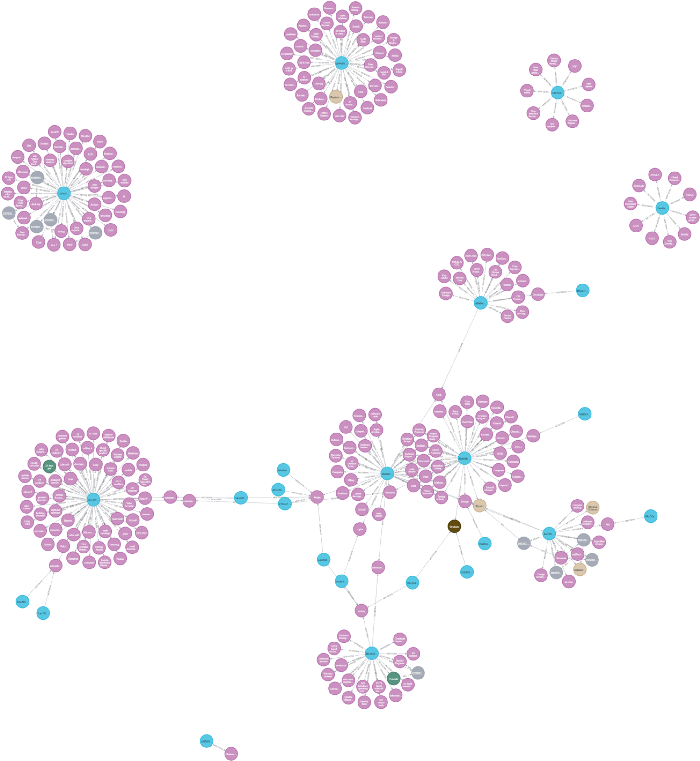
在本文结束的时候,我们就可以创建出如下所示的知识图谱。
命名实体和关系提取
首先,我们加载 NER 和关系模型的依赖关系,以及之前优化过的 NER 模型本身,以提取技能、学历、专业和工作年限:
!pip install -U pip setuptools wheel!python -m spaCy project clone tutorials/rel_component!pip install -U spaCy-nightly --pre!!pip install -U spaCy transformersimport spaCy#安装完依赖项后重启运行时nlp = spaCy.load("[PATH_TO_THE_MODEL]/model-best")加载我们想从中提取实体和关系的职位数据集:
import pandas as pddef get_all_documents():df = pd.read_csv("/content/drive/MyDrive/job_DB1_1_29.csv",sep='"',header=None)documents = []for index,row in df.iterrows():documents.append(str(row[0]))return documentsdocuments = get_all_documents()documents = documents[:]从职位数据集中提取实体:
import hashlibdef extract_ents(documents,nlp): docs = list() for doc in nlp.pipe(documents, disable=["tagger", "parser"]): dictionary=dict.fromkeys(["text", "annotations"]) dictionary["text"]= str(doc) dictionary['text_sha256'] = hashlib.sha256(dictionary["text"].encode('utf-8')).hexdigest() annotations=[]for e in doc.ents: ent_id = hashlib.sha256(str(e.text).encode('utf-8')).hexdigest() ent = {"start":e.start_char,"end":e.end_char, "label":e.label_,"label_upper":e.label_.upper(),"text":e.text,"id":ent_id} if e.label_ == "EXPERIENCE": ent["years"] = int(e.text[0]) annotations.append(ent)dictionary["annotations"] = annotations docs.append(dictionary) #print(annotations) return docsparsed_ents = extract_ents(documents,nlp)在将实体提供给关系提取模型之前,我们可以看下提取出的部分实体:
[('stock market analysis', 'SKILLS'),('private investor', 'SKILLS'), ('C++', 'SKILLS'), ('Investment Software', 'SKILLS'),('MS Windows', 'SKILLS'), ('web development', 'SKILLS'), ('Computer Science', 'DIPLOMA_MAJOR'),('AI', 'SKILLS'),('software development', 'SKILLS'),('coding', 'SKILLS'),('C', 'SKILLS'), ('C++', 'SKILLS'),('Visual Studio', 'SKILLS'),('2 years', 'EXPERIENCE'), ('C/C++ development', 'SKILLS'), ('data compression', 'SKILLS'),('financial markets', 'SKILLS'),('financial calculation', 'SKILLS'),('GUI design', 'SKILLS'),('Windows development', 'SKILLS'), ('MFC', 'SKILLS'), ('Win', 'SKILLS'),('HTTP', 'SKILLS'),('TCP/IP', 'SKILLS'),('sockets', 'SKILLS'), ('network programming', 'SKILLS'), ('System administration', 'SKILLS')]我们现在准备好预测关系了;首先加载关系提取模型,务必将目录改为 rel_component/scripts 以便可以访问关系模型的所有必要脚本。
cd rel_component/import randomimport typerfrom pathlib import Pathimport spaCyfrom spaCy.tokens import DocBin, Docfrom spaCy.training.example import Example#使factory生效from rel_pipe import make_relation_extractor, score_relations#使config生效from rel_model import create_relation_model, create_classification_layer, create_instances, create_tensors#安装完依赖项后重启运行时nlp2 = spaCy.load("/content/drive/MyDrive/training_rel_roberta/model-best")def extract_relations(documents,nlp,nlp2): predicted_rels = list()for doc in nlp.pipe(documents, disable=["tagger", "parser"]): source_hash = hashlib.sha256(doc.text.encode('utf-8')).hexdigest()for name, proc in nlp2.pipeline: doc = proc(doc)for value, rel_dict in doc._.rel.items():for e in doc.ents:for b in doc.ents:if e.start == value[0] and b.start == value[1]: max_key = max(rel_dict, key=rel_dict. get)#print(max_key) e_id = hashlib.sha256(str(e).encode('utf-8')).hexdigest() b_id = hashlib.sha256(str(b).encode('utf-8')).hexdigest()if rel_dict[max_key] >=0.9 :#print(f" entities: {e.text, b.text} --> predicted relation: {rel_dict}") predicted_rels.append({'head': e_id, 'tail': b_id, 'type':max_key, 'source': source_hash})return predicted_relspredicted_rels = extract_relations(documents,nlp,nlp2)Predicted relations: entities: ('5+ years', 'software engineering') --> predicted relation: {'DEGREE_IN': 9.5471655e-08, 'EXPERIENCE_IN': 0.9967771} entities: ('5+ years', 'technical management') --> predicted relation: {'DEGREE_IN': 1.1285037e-07, 'EXPERIENCE_IN': 0.9961034} entities: ('5+ years', 'designing') --> predicted relation:{'DEGREE_IN': 1.3603304e-08, 'EXPERIENCE_IN': 0.9989103} entities: ('4+ years', 'performance management') --> predicted relation: {'DEGREE_IN': 6.748373e-08, 'EXPERIENCE_IN': 0.92884386}Neo4J
现在,我们可以加载职位数据集,并将数据提取到 Neo4j 数据库中了。
首先,我们创建一个空的Neo4j Sandbox,并添加连接信息,如下所示:
documents = get_all_documents()documents = documents[:]parsed_ents = extract_ents(documents,nlp)predicted_rels = extract_relations(documents,nlp,nlp2)#neo4j的基础查询功能from neo4j import GraphDatabaseimport pandas as pdhost = 'bolt://[your_host_address]'user = 'neo4j'password = '[your_password]'driver = GraphDatabase.driver(host,auth=(user, password))def neo4j_query(query, params=None):with driver.session() as session: result = session.run(query, params)return pd.DataFrame([r.values() for r in result], columns=result.keys())接下来,我们将文档、实体和关系添加到知识图谱中。注意,我们需要从实体 EXPERIENCE 的 name 中提取出整数年限,并将其作为一个属性存储起来。
#清空当前的Neo4j Sandbox db (删除所有东西)neo4j_query("""MATCH (n) DETACH DELETE n;""")#创建第一个主节点neo4j_query("""MERGE (l:LaborMarket {name:"Labor Market"})RETURN l""")#向KG中添加实体:技能、经验、学历、专业neo4j_query("""MATCH (l:LaborMarket)UNWIND $data as rowMERGE (o:Offer{id:row.text_sha256})SET o.text = row.textMERGE (l)-[:HAS_OFFER]->(o)WITH o, row.annotations as entitiesUNWIND entities as entityMERGE (e:Entity {id:entity.id})ON CREATE SET e.name = entity.text, e.label = entity.label_upperMERGE (o)-[m:MENTIONS]->(e)ON CREATE SET m.count = 1ON MATCH SET m.count = m.count + 1WITH e as eCALL apoc.create.addLabels( id(e), [ e.label ] )YIELD nodeREMOVE node.labelRETURN node""", {'data': parsed_ents})#为实体EXPERIENCE添加属性'name'res = neo4j_query("""MATCH (e:EXPERIENCE)RETURN e.id as id, e.name as name""")#从EXPERIENCE name中提取工作年限,并保存在属性years中import redef get_years(name):return re.findall(r"\d+",name)[0]res["years"] = res.name.map(lambda name: get_years(name))data = res.to_dict('records')#为实体EXPERIENCE添加属性'years'neo4j_query("""UNWIND $data as rowMATCH (e:EXPERIENCE {id:row.id})SET e.years = row.yearsRETURN e.name as name, e.years as years""",{"data":data})#将关系添加到KGneo4j_query("""UNWIND $data as rowMATCH (source:Entity {id: row.head})MATCH (target:Entity {id: row.tail})MATCH (offer:Offer {id: row.source})MERGE (source)-[:REL]->(r:Relation {type: row.type})-[:REL]->(target)MERGE (offer)-[:MENTIONS]->(r)""", {'data': predicted_rels})现在开始进入有趣的部分了。我们可以启动知识图谱并运行查询了。让我们运行一个查询,找出与目标简历最匹配的职位:
#在表中显示最佳匹配项other_id = "8de6e42ddfbc2a8bd7008d93516c57e50fa815e64e387eb2fc7a27000ae904b6"query = """MATCH (o1:Offer {id:$id})-[m1:MENTIONS]->(s:Entity)<- [m2:MENTIONS]-(o2:Offer)RETURN DISTINCT o1.id as Source,o2.id as Proposed_Offer, count(*) as freq, collect(s.name) as common_termsORDER BY freqDESC LIMIT $limit"""res = neo4j_query(query,{"id":other_id,"limit":3})res#在neo4j浏览器中,使用该查询显示最佳匹配项的图"""MATCH (o1:Offer {id:"8de6e42ddfbc2a8bd7008d93516c57e50fa815e64e387eb2fc7a27000ae904b6"})-[m1:MENTIONS]->(s:Entity)<- [m2:MENTIONS]-(o2:Offer)WITH o1,s,o2, count(*) as freqMATCH (o1)--(s)RETURN collect(o2)[0], o1,s, max(freq)"""以表格形式显示的结果中的公共实体:
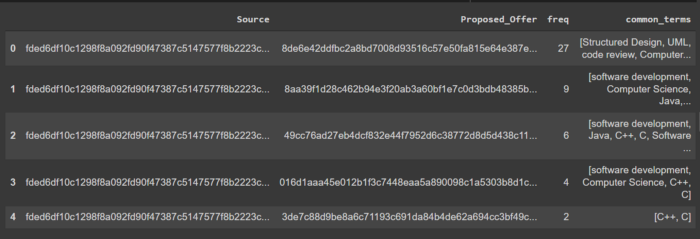
以可视化形式显示的图:

虽然这个数据集只有 29 个职位描述,但这里介绍的方法可以应用于有成千上万个职位的大规模数据集。只需几行代码,我们立马就可以提取出与目标简历匹配度最高的工作。
下面,让我们找出最需要的技能:
query = """MATCH (s:SKILLS)<-[:MENTIONS]-(o:Offer)RETURN s.name as skill, count(o) as freqORDER BY freq DESCLIMIT 10"""res = neo4j_query(query)res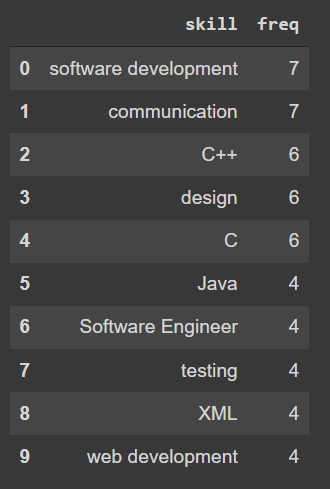
以及需要最高工作年限的技能:
query = """MATCH (s:SKILLS)--(r:Relation)--(e:EXPERIENCE) where r.type = "EXPERIENCE_IN"return s.name as skill,e.years as yearsORDER BY years DESCLIMIT 10"""res = neo4j_query(query)res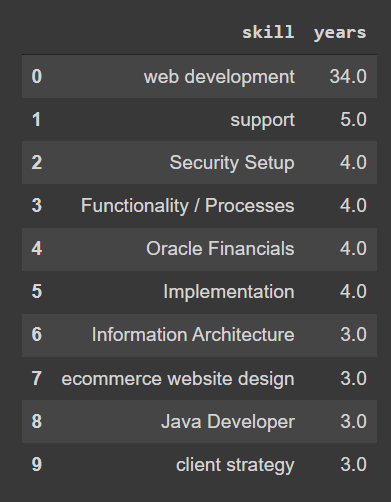
Web 开发和技术支持需要的工作年限最高,然后是安全设置。
最后,让我们查下共现率最高的技能对:
neo4j_query("""MATCH (s1:SKILLS)<-[:MENTIONS]-(:Offer)-[:MENTIONS]->(s2:SKILLS)WHERE id(s1) < id(s2)RETURN s1.name as skill1, s2.name as skill2, count(*) as cooccurrenceORDER BY cooccurrenceDESC LIMIT 5""")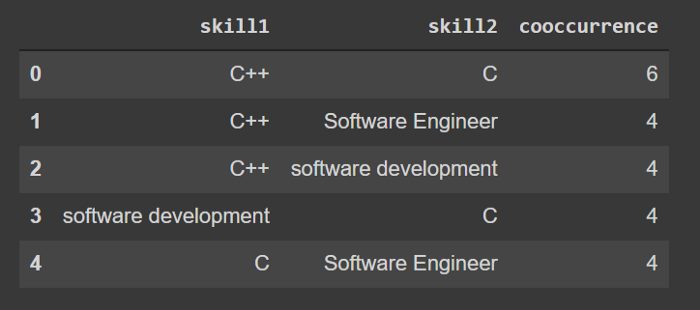
小结
在这篇文章中,我们描述了如何利用基于转换器的 NER 和 spaCy 的关系提取模型,用 Neo4j 创建知识图谱。除了信息提取之外,图的拓扑结构还可以作为其他机器学习模型的输入。
将 NLP 与图数据库 Neo4j 相结合,可以加速许多领域的信息发现,相比之下,在医疗和生物医学领域的应用效果更为显著。
如果你有任何问题或希望为具体用例创建自定义模型,请给我们发邮件(admin@ubiai.tools),或是在 Twitter 上给我们留言(@UBIAI5)。
原文链接:How to Build a Knowledge Graph with Neo4J and Transformers


