前情提要
React 在 v16.8.0 版本中推出了 Hook,作为纯函数组件的增强,给函数组件带来了状态、上下文等等;之前一篇关于 React Hooks 的文章介绍了如何使用一些官方钩子和如何自建钩子,如果想要了解这些内容的同学可以访问《看完这篇,你也能把 React Hooks 玩出花》。
本文不会再介绍上文中已提到的部分钩子的基础使用,而是主要着眼解决一些实际开发中的场景。
现状
Class Component 内部复杂的生命周期函数使得我们组件内部的 componentDidMount 越来越复杂和臃肿,独立组件动辄上千行代码;组件嵌套层级越来越深,组件之间的状态复用也变得非常困难。
Hook 无疑是可选的,他不会对现有项目造成任何冲击和破坏,社区对于它的优势也有过很多讨论;不过目前官方也没有计划移除 Class,而是推荐渐进式的去使用 Hook,在一些新增的组件中优先选用 Hook。那么我们想要在原有以 Class Component 为主的项目中开始使用 Hook,与原有的 Class Component 必然会产生交互,是不是需要将这些 Class Component 重写为 Hook 呢?
将部分复杂的 Class Component 逐步重写为 Hook 应该排在项目迭代的中长期计划中,如果想要在一个迭代中进行大量改造,带来的巨大成本和副作用也是无法估量的。
那么短期内我们就绕不开 Hook 与 Class 组件的混合使用。
解决方案
先简单介绍一下两种组件的基本写法:
Class Components:类组件的写法
export default class ShowHook extends Component { return ( <h1>Hello Hook!</h1> );}Function Components:Hook 组件的写法
function ShowHook (props){ return ( <h1>Hello Hook!</h1> );}混合使用就难以避免的需要进行通信和参数传递,下面我用一个简单的处理模块显示隐藏的功能组件 ShowHook 作为一个例子,介绍三种是比较常见混合使用的方式,先来看一下效果:

1.Render props
Render props 中来自父组件的 props children 是一个 Function,我们可以将子组件的内部变量通过函数传递至父组件,达到通信的目的。
// 子组件 SayHello.jsimport React, { useState } from 'react';function sayHello({ children }) { const [visible, changeVisible] = useState(false); const jsx = visible && ( <h1 onClick={() => changeVisible(false)}> Hello Hook! </h1> ); return children({ changeVisible, jsx });}export default sayHello;父组件获取到 changeVisible 方法之后就能方便的控制 visible 的状态。
// 父组件 ShowHook.jsimport React, { Component, Fragment } from 'react';import SayHello from '../components/SayHello';export default class ShowHook extends Component { render() { return ( <SayHello> {({ changeVisible, jsx }) => { return ( <> <button onClick={() => changeVisible(true)}> showChild </button> {jsx} </> ); }} </SayHello> ); }}props.children 常用的类型是字符串、对象甚至数组;但其实我们也可以传入一个函数,只要最终能返回出 DOM 树即可;Render props 是将 Render 部分抽离出来作为函数传入子组件;它主要的作用是将 state 部分抽成组件,实现 state 的复用。
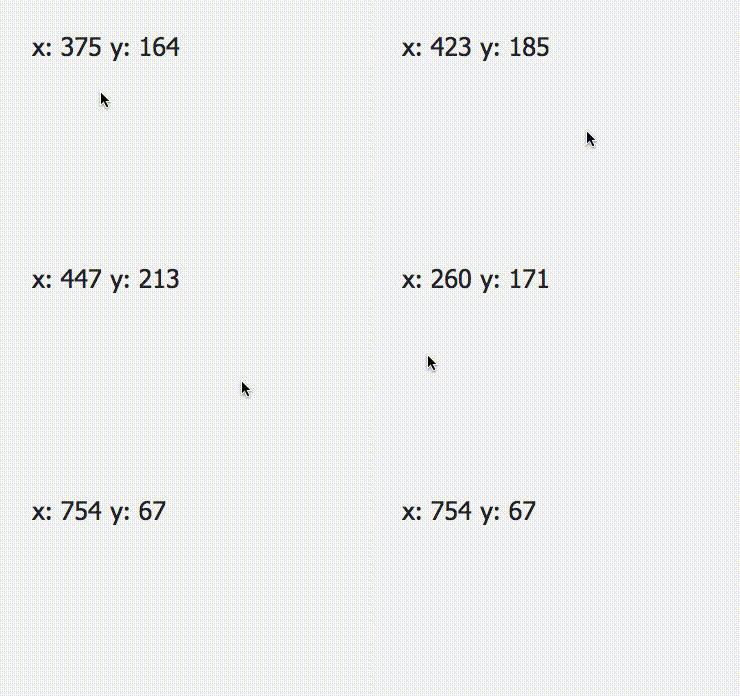
// 封装子组件function Mouse (props) { const [position, setPosition] = useState({x: 0,y: 0}); const handleMouseMove = (e) => { setPosition({ x: e.clientX, y: e.clientY }) } return ( <div onMouseMove={handleMouseMove}> {this.props.children(position)} </div> )}// 使用场景 1:图片位置跟随鼠标class Cat1 extends React.Component { render() { return ( <Mouse> {(position) => <img src="/cat.jpg" style={{ position: 'absolute', left: position.x, top: position.y }} /> } </Mouse> ) }}// 使用场景 2:页面展示鼠标坐标class Cat2 extends React.Component { render() { return ( <Mouse> {(position) => <h1>x: {position.x} y: {position.y}</h1> } </Mouse> ) }}上面使用了 React 官方文档中的例子进行改写,具体效果如下:
场景 1:

场景 2:

2.使用 HOC
HOC (Higher-Order Components) 是另一种提高代码复用率的常见技巧,它接收一个组件作为参数,最终返回出一个新的组件。
下面的方法使得 button 控制任意组件显示隐藏的功能被封装为高阶组件,得以复用,并且 setVisible 方法也能被传递到 Class Component 中。
// 高阶组件 SayHello.jsimport React, { useState, Fragment } from 'react';const sayHello = (Component) => { return (props) => { const [visible, setVisible] = useState(false); return ( <Fragment> <button onClick={() => setVisible(true)}> showChild </button> {visible && <Component changeVisible={setVisible} visible={visible} />} </Fragment> ); };};export default sayHello;在外部 Class Component 中我们可以定制受内部显示/隐藏控制的组件,并且使用高阶组件中向外传递的 props。
// ShowHook.jsimport React, { Component } from 'react';import SayHello from '../components/SayHello';class ShowHook extends Component {render() { const { changeVisible } = this.props; return ( <h1 onClick={() => changeVisible(false)}> Hello Hook! </h1> );}}export default SayHello(ShowHook);HOC 在实际使用中是将一些副作用函数、公用方法作为组件抽取出来,从而提升复用率;我们可以把父组件的render 部分改为一个弹窗,或任意内容使得子组件得到复用,例如:
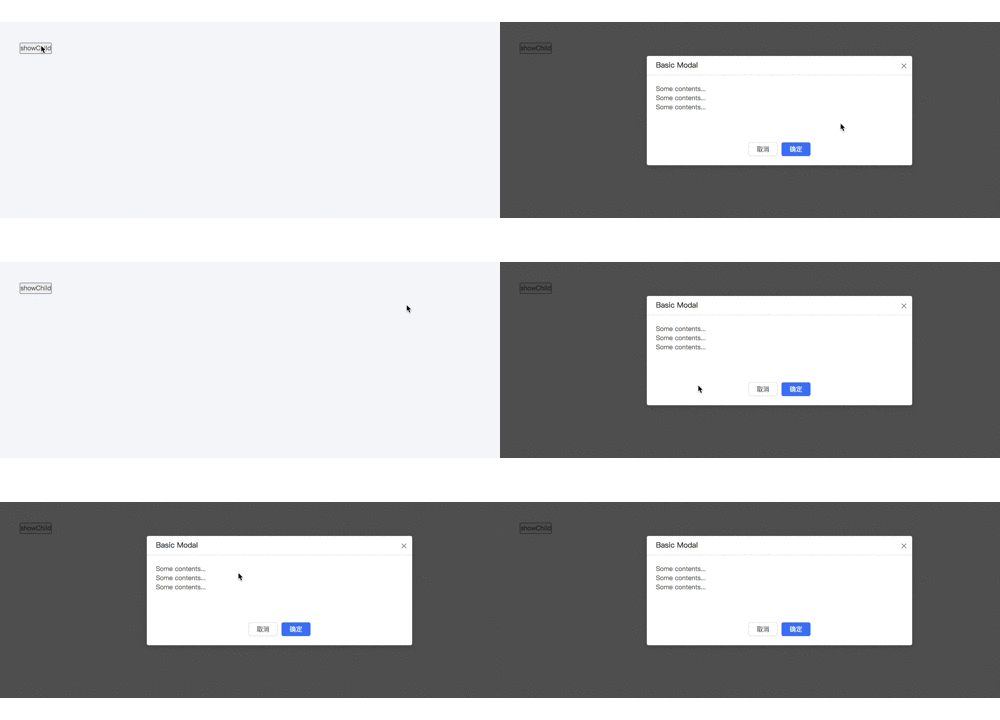
// 复用高阶组件 SayHelloimport React, { Component } from 'react';import SayHello from '../components/SayHello';import { Modal } from 'antd';class ShowModal extends Component { render() { const { changeVisible, visible } = this.props; return ( <Modal title="Basic Modal" visible={visible} onOk={() => changeVisible(false)} onCancel={() => changeVisible(false)} > <p>Some contents...</p> <p>Some contents...</p> <p>Some contents...</p> </Modal> ); }}export default SayHello(ShowHook);这样就可以轻松的控制弹窗的显示隐藏;实际效果如下:

3.useImperativeHandle & Refs 转发 (React.forwardRef)
Ref 转发是一项将 Ref (https://zh-hans.reactjs.org/docs/refs-and-the-dom.html) 自动地通过组件传递到其一子组件的技巧。对于大多数应用中的组件来说,这通常不是必需的,但其对某些组件,尤其是可重用的组件库是很有用的。
它可以将子组件的方法暴露给父组件使用。
// 父组件 ShowHook.jsimport React, { Component } from 'react';import SayHello from './SayHello';export default class ShowHook extends Component { showChild = () => { console.log(this.child); //可以看到 changeVisible 方法被挂载到了 this.child 下 // {changeVisible: f()} this.child.changeVisible(true); } // 将子组件暴露出来的对象挂载到 child onRef = (ref) => { this.child = ref; } render() { return ( <> <button onClick={this.showChild}>showChild</butotn> <SayHello ref={this.onRef} /> </> ); }}// 子组件 SayHello.jsimport React, { useState, useImperativeHandle, forwardRef } from 'react';function SayHello(props, ref) { const [visible, changeVisible] = useState(false); // 暴露的子组件方法,给父组件调用 useImperativeHandle(ref, () => { return { changeVisible, }; }); return visible && ( <h1 onClick={() => changeVisible(false)}> Hello Hook! </h1> );}export default forwardRef(SayHello);上面例子中封装了一个子组件,任意一个使用了该子组件的地方都可以控制它的状态。
结束语
目前 Hooks 尚不具备完整的 Class Component 的功能,一些不常用的生命周期函数尚不支持,例如:getSnapshotBeforeUpdate, getDerivedStateFromError 以及 componentDidCatch,但官方已将他们 排入计划内,相信不久之后就会得到支持;未来 Hooks 可能将成为 React Components 的首选,在现阶段就让我们愉快的混合使用吧。
头图:Unsplash
作者:Rebecca
原文:https://mp.weixin.qq.com/s/I8WKWMAU_voRuLhbavpyuQ
原文:“混合双打”之如何在 Class Components 中使用 React Hooks
来源:政采云前端团队 - 微信公众号 [ID:Zoo-Team]
转载:著作权归作者所有。商业转载请联系作者获得授权,非商业转载请注明出处。


